> ## Documentation Index
> Fetch the complete documentation index at: https://auth0.generaltranslation.app/llms.txt
> Use this file to discover all available pages before exploring further.

> Use Self-Service SSO to delegate SSO setup to your B2B customers.

# Manage Self-Service SSO

Self-Service <Tooltip tip="Single Sign-On (SSO): Service that, after a user logs into one applicaton, automatically logs that user in to other applications." cta="View Glossary" href="/docs/glossary?term=Single+Sign-On">Single Sign-On</Tooltip> (SSO) provides business-to-business (B2B) customers with the tools needed to delegate SSO setup to their enterprise customers.

Self-Service SSO requires minimal configuration in your Auth0 tenant and provides your customers with a self-service assistant that guides them through the enablement process. After a customer completes their setup, the SSO integration is automatically added to your tenant as an [Enterprise connection](/docs/authenticate/enterprise-connections).

<Callout icon="file-lines" color="#0EA5E9" iconType="regular">
  Self-Service SSO is only available to B2B customers on Professional or Enterprise plans.

  Users with the following Dashboard roles can engage with this feature:

  * **Admin** and **Editor - Connections** users can create and manage self-service profiles.
  * **Viewer - Config** users can view self-service profiles only.
</Callout>

To facilitate Self-Service SSO, you will configure the following components using either the <Tooltip tip="Management API: A product to allow customers to perform administrative tasks." cta="View Glossary" href="/docs/glossary?term=Management+API">Management API</Tooltip> or the <Tooltip tip="Management API: A product to allow customers to perform administrative tasks." cta="View Glossary" href="/docs/glossary?term=Auth0+Dashboard">Auth0 Dashboard</Tooltip>:

* **Self-service profile**: Defines key elements of customer SSO implementations, including the <Tooltip tip="Identity Provider (IdP): Service that stores and manages digital identities." cta="View Glossary" href="/docs/glossary?term=identity+providers">identity providers</Tooltip> (IdPs) they can use and which user attributes they must capture, such as email. You can create up to 20 profiles in your tenant for different customers or segments.
* **Self-service access ticket**: Grants customer admins access to the [**self-service assistant**](/docs/authenticate/enterprise-connections/self-service-SSO#self-service-assistant-experience) and sets specific details for their resulting Enterprise connection. Access tickets allow customer admins to either create new or modify existing connections.

The sections below provide expanded steps for configuring self-service profiles and generating self-service access tickets to share with customer admins.

## Create self-service profiles

You can create self-service profiles using the Auth0 Dashboard or the Management API.

Self-service profiles are used to determine key elements of customer implementations, including:

* Which identity providers customer admins can use for SSO.
* Which user attributes they must capture through SSO, such as email or family name.
* Branding options that customize the look and feel of the self-service assistant.

You can create up to 20 profiles as needed to accommodate different customers or segments.

<Tabs>
  <Tab title="Auth0 Dashboard">
    To create a self-service profile on the Auth0 Dashboard: 

    1. Navigate to [Authentication > Enterprise](https://manage.auth0.com/#/connections/enterprise) and open the **Self-Service SSO** section. Then, select **Create Profile**.
    2. In the space provided, enter a name and optional description for the profile. Then, select **Create**.<br />
          A. **Optional** Attach a User Attribute Profile.
          <Note>
          If you create and attach, or enable an existing User Attribute Profile, you will not have the option to add attributes via the User Profile tab.
          </Note>
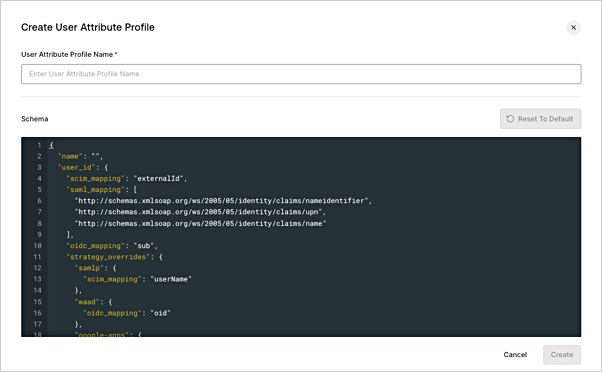
             1. Select an existing UAP or create a new one. For a new UAP:<br />
                a. Add a name.<br />
                b. Review mappings to ensure the profile attributes are mapping to your preferred Auth0 attributes.
                   <Frame><img src="https://mintcdn.com/generaltranslationinc/IhLUvTv5J5eZ1VeH/docs/images/cdy7uua7fh8z/Authenticate%3EEnterprise%3ESelf-Service%3EUAP.png?fit=max&auto=format&n=IhLUvTv5J5eZ1VeH&q=85&s=e4ddbd7dd6db164a29a7bbcea0ac630d" alt="UAP mapping Authentication > Enterprise > Self-Service" data-og-width="602" width="602" data-og-height="372" height="372" data-path="docs/images/cdy7uua7fh8z/Authenticate>Enterprise>Self-Service>UAP.png" data-optimize="true" data-opv="3" srcset="https://mintcdn.com/generaltranslationinc/IhLUvTv5J5eZ1VeH/docs/images/cdy7uua7fh8z/Authenticate%3EEnterprise%3ESelf-Service%3EUAP.png?w=280&fit=max&auto=format&n=IhLUvTv5J5eZ1VeH&q=85&s=bcd25f5a154a33aded8bad060af8c192 280w, https://mintcdn.com/generaltranslationinc/IhLUvTv5J5eZ1VeH/docs/images/cdy7uua7fh8z/Authenticate%3EEnterprise%3ESelf-Service%3EUAP.png?w=560&fit=max&auto=format&n=IhLUvTv5J5eZ1VeH&q=85&s=d1c7c55c49113de49c8bcd248d0db251 560w, https://mintcdn.com/generaltranslationinc/IhLUvTv5J5eZ1VeH/docs/images/cdy7uua7fh8z/Authenticate%3EEnterprise%3ESelf-Service%3EUAP.png?w=840&fit=max&auto=format&n=IhLUvTv5J5eZ1VeH&q=85&s=f7060c6684870cf433dc16f18d870f03 840w, https://mintcdn.com/generaltranslationinc/IhLUvTv5J5eZ1VeH/docs/images/cdy7uua7fh8z/Authenticate%3EEnterprise%3ESelf-Service%3EUAP.png?w=1100&fit=max&auto=format&n=IhLUvTv5J5eZ1VeH&q=85&s=8f0bcb4c509cf51621e9ad265b0cfef5 1100w, https://mintcdn.com/generaltranslationinc/IhLUvTv5J5eZ1VeH/docs/images/cdy7uua7fh8z/Authenticate%3EEnterprise%3ESelf-Service%3EUAP.png?w=1650&fit=max&auto=format&n=IhLUvTv5J5eZ1VeH&q=85&s=92734dc7c6e64976984cb1bdf2abde98 1650w, https://mintcdn.com/generaltranslationinc/IhLUvTv5J5eZ1VeH/docs/images/cdy7uua7fh8z/Authenticate%3EEnterprise%3ESelf-Service%3EUAP.png?w=2500&fit=max&auto=format&n=IhLUvTv5J5eZ1VeH&q=85&s=895e5c3bc3345bf7803ee9cae22e635a 2500w" /></Frame>
    3. On the **Settings** tab, complete the sections below. Then, select **Save**.
       * **Identity Providers (IdP)**: Enable one or more identity providers. In the self-service assistant, customer admins can select their preferred option from the list of enabled providers.
       * **Branding**: Provide a logo and primary color for the self-service assistant.
       * **Custom Introduction**: Modify or replace the default message as needed. This introduction text displays to customer admins on the landing page of the self-service assistant. Your messaging can include basic formatting options, such as bolding or hyperlinks, and is limited to 2000 characters.
    4. On the **User Profile** tab, add up to 20 user attributes that your customers should capture through SSO, such as email or family name. You can set each attribute as `required` or `optional`.

       * During the self-service assistant flow, customer admins will be prompted to map these defined user attributes to their identity provider to ensure the necessary values are passed to Auth0.
  </Tab>

  <Tab title="Management API">
    To create a self-service profile, first call the Self-Service Profiles endpoint to create the profile. Then, use a PUT call to optionally modify its introduction text.

    #### Create a self-service profile:

    1. Make a POST call to the [Self-Service Profiles](https://auth0.com/docs/api/management/v2/self-service-profiles/post-self-service-profiles) endpoint.
    2. Specify the following parameters in the request body, as needed:

    <table class="table">
      <thead>
        <tr>
          <th><strong>Parameter</strong></th>
          <th><strong>Required?</strong></th>
          <th><strong>Description</strong></th>
        </tr>
      </thead>

      <tbody>
        <tr>
          <td><code>name</code></td>
          <td>Yes</td>
          <td>String. Maximum length is 100.<br /><br />A user-friendly name for the self-service profile.</td>
        </tr>

        <tr>
          <td><code>description</code></td>
          <td>No</td>
          <td>String. Maximum length is 140.<br /><br />A description of the self-service profile.</td>
        </tr>

        <tr>
          <td><code>allowed\_strategies</code></td>
          <td>No</td>
          <td>Array.<br /><br />One or more identity providers that customer admins can use to implement SSO. If no parameters are selected, all are passed by default. <br /><br />Options include: <br /><br /><ul><li><code>okta</code> for Okta Workforce Identity</li><li><code>waad</code>for Entra ID</li><li><code>google-apps</code> for Google Workspace</li><li><code>keycloak-samlp</code> for Keycloak</li><li><code>adfs</code> for Microsoft Active Directory Federation Services</li><li><code>pingfederate</code> for PingFederate</li><li><code>oidc</code> for generic OIDC</li><li><code>samlp</code> for generic SAML</li></ul></td>
        </tr>

        <tr>
          <td><code>branding</code></td>
          <td>No</td>
          <td>Object. <br /><br />Used to customize the styling of the self-service assistant presented to customer admins.</td>
        </tr>

        <tr>
          <td><code>branding.logo\_url</code></td>
          <td>No</td>
          <td>String. Maximum length is 1024.<br /><br />An HTTPS URL that points to a logo image. If provided, this logo displays to the top right of the self-service assistant.</td>
        </tr>

        <tr>
          <td><code>branding.colors</code></td>
          <td>No</td>
          <td>Object.<br /><br />Sets a primary color for certain elements of the self-service assistant, such as interactive buttons.</td>
        </tr>

        <tr>
          <td><code>branding.colors.primary</code></td>
          <td>Yes, when defining branding.colors.</td>
          <td>String.<br /><br />Specifies the hex value of the primary color used for the self-service assistant.</td>
        </tr>

        <tr>
          <td><code>user\_attributes</code></td>
          <td>No</td>
          <td>Object. Maximum length is 20.<br /><br />Stores mapping information presented to customer admins during the self-service assistant flow. Customer admins are instructed to map these attributes to their identity provider to ensure the specified attributes are passed to Auth0.</td>
        </tr>

        <tr>
          <td><code>user\_attributes\[].name</code></td>
          <td>Yes, when defining user\_attributes.</td>
          <td>String. Maximum length is 255.<br /><br />Name of the user attribute in Auth0.</td>
        </tr>

        <tr>
          <td><code>user\_attributes\[].description</code></td>
          <td>Yes, when defining user attributes.</td>
          <td>String. Maximum length is 255.<br /><br />Human-readable description of the user attribute.</td>
        </tr>

        <tr>
          <td><code>user\_attributes\[].is\_optional</code></td>
          <td>Yes, when defining user attributes.</td>
          <td>Boolean.<br /><br />Indicates whether an attribute is optional or required by the customer in order for the application to function.<br /><br /><ul><li>To set an attribute as required, use <code>true</code>.</li><li>For optional attributes, use <code>false</code>.</li></ul></td>
        </tr>

        <tr>
          <td><code>user\_attribute\_profile\_id</code></td>

          <td>
            No.
          </td>

          <td>
            ID of the [User Attribute Profile](/docs/authenticate/enterprise-connections/user-attribute-profile) to associate with self-service accounts.
          </td>
        </tr>
      </tbody>
    </table>

    **Example Request Body**

    ```json lines theme={null}
    {
      "name": "Example Profile",
      "description": "An example profile for all customers",
      "allowed_strategies": ["okta","adfs","google-apps"],
      "user_attributes": [
        {
          "name": "email",
          "description": "User's email",
          "is_optional": false,
        }
      ],
      "branding": {
         "logo_url": "https://example.com/logo.png",
         "colors": {
           "primary": "#334455"
         }
      }
    }
    ```

    #### Customize your introduction text

    When a customer admin accesses the self-service assistant, they first land on an introduction page that welcomes them to the experience. By default, the following message is provided:

    "You are a few simple steps away from setting up SSO. This setup process involves making some changes to your identity provider. Before you begin, open your identity provider in a separate browser tab or window."

    You can modify this text by making a PUT call to the [Custom Text for Self-Service Profiles](https://auth0.com/docs/api/management/v2/self-service-profiles/put-self-service-profile-custom-text) endpoint.

    <Warning>
      Be aware that this call **overwrites** any messaging currently set for the self-service profile. Ensure your call includes the complete text you wish to display to your customer admins.
    </Warning>

    1. Call `PUT /api/v2/self-service-profiles/{id}/custom-text/{language}/{page}`, where

       * `id` is the profile ID of the self-service profile
       * `language` is set to `en`
       * `page` is set to `get-started`
    2. In the request body, specify the following:

    <table class="table">
      <thead>
        <tr>
          <th><strong>Property</strong></th>
          <th><strong>Description</strong></th>
        </tr>
      </thead>

      <tbody>
        <tr>
          <td><code>introduction</code></td>
          <td>String. Maximum length is 2000.<br /><br />Full introduction text to display on the landing page of the self-service assistant. Text can include basic formatting options, such as bolding or hyperlinks.<br /><br />Custom text provided through this parameter completely overwrites any previous messaging. For best results, ensure you provide the full message you wish to display to customer admins.<br /><br />Sending an empty body <code>\{}</code> resets any customized messaging to the default text.</td>
        </tr>
      </tbody>
    </table>

    3. In response, the created entity is returned.

    **Example Call**

    ```js lines theme={null}
    PUT /api/v2/self-service-profiles/ssp_1234567890/custom-text/en/get-started

    {
      introduction: "Welcome! With <b>only a few steps</b>, you'll be able to setup your new connection. For assistance, contact <a href="https://www.examplesupportsite.com"> our support team </a>." 
    }
    ```

    **Example Response**

    ```js lines theme={null}
    {
      introduction: "Welcome! With <b>only a few steps</b>, you'll be able to setup your new connection. For assistance, contact <a href="https://www.examplesupportsite.com"> our support team </a>." 
    }
    ```
  </Tab>
</Tabs>

## Manage self-service access tickets

After creating at least one self-service profile, you can generate self-service access tickets using either the Auth0 Dashboard or the Management API.

Self-service access tickets serve two primary purposes:

* Granting customer admins access to the self-service assistant where they can configure a new SSO connection or modify an existing connection.
* Predefining key details and behaviors of new SSO connections your customer admins will configure, such as which applications or organizations will be enabled for the new connection.

When generating access tickets, you can also enable certain features such as <Tooltip tip="Security Assertion Markup Language (SAML): Standardized protocol allowing two parties to exchange authentication information without a password." cta="View Glossary" href="/docs/glossary?term=SAML">SAML</Tooltip> IdP-initated SSO, configure Identity Provider Domains (which drive Home Realm Discovery), and domain verification.

#### SAML IdP-initiated SSO

SAML IdP-initiated SSO is a style of implementation that allows identity providers to initiate SSO and redirect users to the service provider for authentication.

When enabling this option for Self-Service SSO, you must provide your default application and response protocol. You can also provide an optional query string to further customize the connection's behavior.

To learn more about these options, review [Configure SAML Identity Provider-Initiated Single Sign-On](/docs/authenticate/protocols/saml/saml-sso-integrations/identity-provider-initiated-single-sign-on).

#### Email domain verification IdP domains

Self-Service SSO supports two ways to associate email domains with an Enterprise connection. Both methods populate the same field: `options.domain_aliases `, which drives Home Realm Discovery (HRD):

1. IdP Domains (tenat-managed):Tenant admin adds known domains directly to the connection.
2. Email Domain Verification (self-managed): Your IT admin verifies the domain during setup in the self-service assistant.

<Note>
  These mechanisms apply to email domains used for HRD and SSO routing. They are not related to Custom Domain verification at the tenant level.
</Note>

##### Identity Provider Domain verification

Use IdP Domains to pre-associate email domains to an Enterprise connection at the tenant-level. Added domains are treated as trusted and are written directly to `options.domain_aliases`.

You can provide domains when [generating self-service access tickets](#generate-access-tickets-for-new-connections) through either the Auth0 Dashboard or the Management API.

* **Auth0 Dashboard**: On the **Generate Ticket** page, use the **Identity Provider Domains** field to specify your list of domains.
* **Management API**: Set `connection_config.options.domain_aliases` to the list of domains.

Domains added by tenant admins are treated as **trusted** and **do not** require the customer admin to complete verification. If you want IT admins to verify a domain instead of the domain treated as **trusted**, set `domain_aliases_config.domain_verification` to `required` or `optional` to prompt verification from the self-service assistant.

##### Email Domain verification

In contrast to IdP domains, **Email Domain verification** confirms an IT admin owns the domain they provide during self-service setup. When verification is complete, the verified domain is added to the same `options.domain_aliases` array on the connection.

You can enable verification for IT admins when you generate self-service access tickets:

* **Auth0 Dashboard**: On the **Generate Ticket** page, use the **Domain Verification Requirement** field.
* **Management API**: Use `domain_aliases_config.domain_verification` with one of the following options:
  * `none` (default) : The self-service assistant does not prompt a customer admin to verify their domain.
  * `required`: The self-service assistant prompts the customer admin to verify their domains.
  * `optional`: The self-service assistant prompts the customer admin to verify their domain. The customer admin can choose to either enter their domain for verification or skip the step.

Verification could take up to 24–48 hours in some cases, and you may need to issue a follow-up access ticket to let the customer admin return and enable the connection. Access tickets expire five hours after first being opened. Review [Generate access tickets for existing connections](https://auth0.com/docs/authenticate/enterprise-connections/self-service-SSO/manage-self-service-sso#generate-access-tickets-for-existing-connections).

### Generate access tickets for new connections

You can generate access tickets for new connections through either the Auth0 Dashboard or the Management API.

<Warning>
  By default, access ticket URLs remain valid for five days after generation. After accessing the ticket URL, the customer admin has five hours to complete their setup. An access ticket URL can be accessed a maximum of 10 times; once this limit is reached, a new access ticket must be requested.

  If needed, you can revoke an access ticket prior to its expiration to immediately cease access to the self-service assistant.
</Warning>

<Tabs>
  <Tab title="Auth0 Dashboard">
    To generate an access ticket for a new connection through the Auth0 Dashboard:

    1. Navigate to [Authentication > Enterprise](https://manage.auth0.com/#/connections/enterprise) and access the **Self-Service SSO** section. Then, select the self-service profile with which you want to create an access ticket.

    2. Select **Generate Ticket** to open the ticket form. Under **Select ticket type**, choose **Create a new connection**.

    3. Under **Ticket configuration**, provide a required name for the connection your customer admin will configure.

    4. In the **Settings** section, configure additional options as needed for the new connection:

       * **Display Name**: A user-friendly name for the connection that displays on Universal Login prompts.
       * **Enabled Clients**: A comma-separated list of client IDs to associate with the connection.
       * **Enabled Organizations**: A comma-separated list of organization IDs to associate with the connection.
       * **Display connection a as button**: Displays the connection as an authentication option on the login screen.
       * **Display connection as a button for organizations**: Displays the connection as an authentication option on the login screen for the specified organizations.
       * **Assign membership on login for organizations**: Automatically grant organization membership to users who authenticate with the connection.
       * **Enable as a domain level connection**: Allow 3rd-party applications to use the connection; requires [Dynamic Client Registration](/docs/get-started/applications/dynamic-client-registration).
       * **Accept SAML IdP-initiated SSO**: Enables [SAML Identity Provider-initiated SSO](/docs/authenticate/protocols/saml/saml-sso-integrations/identity-provider-initiated-single-sign-on).

    5. Under **Home Realm Discovery**, optionally provide a comma-separated list of IdP domains to compare to users’ email domains. These domains are stored in `options.domain_aliases` and drive HRD. Domains added here are treated as trusted and do not require customer admin verification. For more information, review [Home Realm Discovery](#home-realm-discovery).

    6. Under **Domain Verification Requirement**, choose your desired level of verification:
       * **Off**: Customer admins are not prompted to verify their domain when setting up SSO. **Off** is the default setting for new access tickets.
       * **Optional**: Customer admins are prompted to verify their domain when setting up SSO. However, they can skip this step and enable their connection without completing verification.
       * **Required**: Customer admins must verify their domain when setting up SSO. They will not be able to enable their connection until verification is complete.

    7. Under **Provisioning**, optionally enable **Sync user profiles using provisioning**. When enabled, additional configuration is available:
       * **Bearer Token Expiration**: Define an expiration date for the SCIM bearer token. By default, bearer tokens do not expire.
       * **Bearer Token Permissions (Scopes)**: Choose which actions the token can perform. By default, all provisioning scopes are enabled:
         * `get:users`
         * `post:users`
         * `put:users`
         * `patch:users`
         * `delete:users`

    8. Under **Time to Live**, set an expiration period for the access ticket in seconds. By default, time to live is set to 432000 seconds (which equals five days).

       * Time to Live determines how long an access ticket URL is active **before** a customer admin launches the self-service assistant. It does not determine how long the customer admin has access to the assistant after it’s been launched. The expiration of the self-service assistant itself is 5 hours and cannot be configured.

    9. Under **Metadata**, add up to 10 metadata associated with the connection.

    10. Review your access ticket configuration for accuracy. Then, select **Create Ticket**.

    A Ticket Information popup containing the access ticket URL then displays. Copy and save this URL somewhere safe, as you cannot retrieve this URL again after closing the popup.

    You can share the access ticket URL with your customer admin through email, chat, or another communication channel to grant them access to the self-service assistant. The assistant will then guide them through configuring the SSO connection. To learn more about that experience, review [Self-service assistant experience](/docs/authenticate/enterprise-connections/self-service-SSO#self-service-assistant-experience).
  </Tab>

  <Tab title="Management API">
    To generate an access ticket through the Management API.

    1. Retrieve the ID of the self-service profile you want to associate with the access ticket through the [Retrieve Self-Service Profiles](https://auth0.com/docs/api/management/v2/self-service-profiles/get-self-service-profiles) endpoint.
    2. Call the [SSO Access Ticket](https://auth0.com/docs/api/management/v2/self-service-profiles/post-sso-ticket) endpoint using the ID of the appropriate self-service profile:

    `POST  /api/v2/self-service-profiles/{id}/sso-ticket`

    In the request body, specify the parameters described in the table below.

    <table class="table">
      <thead>
        <tr>
          <th><strong>Parameter</strong></th>
          <th><strong>Description</strong></th>
        </tr>
      </thead>

      <tbody>
        <tr>
          <td><code>connection\_config</code></td>
          <td>Object.<br /><br />Required when generating an access ticket for <strong>a new SSO connection</strong>. Customer admins will be able to modify key elements of the connection, such as the SAML certificate or OIDC ID or secret.</td>
        </tr>

        <tr>
          <td><code>connection\_config.name</code></td>
          <td><strong>Required</strong>. String.<br /><br />Name for the connection created through the SSO setup assistant. Maximum length is 128.</td>
        </tr>

        <tr>
          <td><code>connection\_config.display\_name</code></td>
          <td><strong>Optional</strong>. String.<br /><br />User-friendly name for the new connection created through the self-service assistant. This name displays on Universal Login prompts. Maximum length is 128.</td>
        </tr>

        <tr>
          <td><code>connection\_config.is\_domain\_connection</code></td>
          <td><strong>Optional</strong>. Boolean.<br /><br />Set to <code>true</code> if the connection is at the domain level; requires <a href="/docs/get-started/applications/dynamic-client-registration">Dynamic Client Registration</a>.</td>
        </tr>

        <tr>
          <td><code>connection\_config.show\_as\_button</code></td>
          <td><strong>Optional</strong>. Boolean.<br /><br />When <code>true</code>, the connection displays as an authentication option on your application's login screen.</td>
        </tr>

        <tr>
          <td><code>connection\_config.metadata</code></td>
          <td><strong>Optional</strong>. Object\[].<br /><br />Metadata associated with the new connection.<br /><br /> Object can contain up to 10 key-value pairs. String values limited to 255 characters.</td>
        </tr>

        <tr>
          <td><code>connection\_config.options</code></td>
          <td><strong>Optional</strong>. Object\[].<br /><br />Options for the new connection, including:<br /><br /><ul><li><code>icon\_url</code></li><li><code>domain\_aliases\[]</code></li><li><code>idpinitiated</code></li></ul></td>
        </tr>

        <tr>
          <td><code>connection\_config.options.icon\_url</code></td>
          <td><strong>Optional</strong>. String.<br /><br />URL of the icon image to use if <code>connection\_config.show\_as\_button</code> is enabled. Must use HTTPS.</td>
        </tr>

        <tr>
          <td><code>connection\_config.options.domain\_aliases</code></td>
          <td><strong>Optional</strong>. String\[].<br /><br />Domains to use for home realm discovery.<br /><br />Domains entered into <code>domain\_aliases</code> are automatically marked as verified. To have a customer admin verify a domain themselves, do not specify this attribute and instead use <code>domain\_aliases\_config</code> (described further on in this table). This option allows you to prompt the customer admin to verify their domain through the self-service assistant.<br /><br />For more information, review <a href="/docs/authenticate/enterprise-connections/self-service-SSO/manage-self-service-sso#domain-verification-and-home-realm-discovery">Domain Verification and Home Realm Discovery</a>.</td>
        </tr>

        <tr>
          <td><code>connection\_config.options.idpinitiated</code></td>
          <td><strong>Optional</strong>. Object.<br /><br />Allows <a href="/docs/authenticate/enterprise-connections/self-service-SSO/manage-self-service-sso#saml-idp-initiated-sso">SAML IdP-initiated SSO</a> and includes the following attributes:<br /><br /><ul><li><code>enabled</code></li><li><code>client\_id</code></li><li><code>client\_protocol</code></li><li><code>client\_authorizequery</code></li></ul><br />For full details, review the <a href="https://auth0.com/docs/api/management/v2/self-service-profiles/post-sso-ticket">SSO Access Ticket</a> endpoint in the Management API Explorer.</td>
        </tr>

        <tr>
          <td><code>enabled\_clients</code></td>
          <td><strong>Optional</strong>. String\[].<br /><br />A list of application client IDs to associate with the new connection.</td>
        </tr>

        <tr>
          <td><code>enabled\_organizations</code></td>
          <td><strong>Optional</strong>. Object\[].<br /><br />A list of organizations to associate with the new connection.</td>
        </tr>

        <tr>
          <td><code>enabled\_organizations\[].organization\_id</code></td>
          <td><strong>Required</strong> when using <code>enabled\_organizations</code>.<br /><br /> String.<br /><br /> ID of a specific organization to associate with the new connection.<br /><br />You can retrieve IDs through the Organizations section of the <a href="https://manage.auth0.com/#/organizations">Auth0 Dashboard</a>, the <a href="https://auth0.com/docs/api/management/v2/organizations/get-organizations">Get Organizations</a> endpoint, or the <a href="https://auth0.com/docs/api/management/v2/organizations/get-name-by-name">Get Organization by Name</a> endpoint.</td>
        </tr>

        <tr>
          <td><code>enabled\_organizations\[].assign\_membership\_on\_login</code></td>
          <td><strong>Optional</strong>. Boolean.<br /><br />When <code>true</code>, users who log in with the new connection are automatically granted membership to the specified organization.</td>
        </tr>

        <tr>
          <td><code>enabled\_organizations\[].show\_as\_button</code></td>
          <td><strong>Optional</strong>. Boolean.<br /><br />When <code>true</code>, the new connection displays as an authentication option on the Organization login screen for your application.</td>
        </tr>

        <tr>
          <td><code>ttl\_sec</code></td>
          <td><strong>Optional</strong>. Number.<br /><br />Number of seconds an access ticket URL remains active before a customer admin launches the self-service assistant. If unspecified or set to 0, the value defaults to <code>432000</code> (which equals 5 days).<br /><br />Note that this expiration period does not determine how long a customer admin has access to the self-service after it’s been launched. The expiration of the assistant itself is 5 hours and cannot be configured.</td>
        </tr>

        <tr>
          <td><code>domain\_aliases\_config</code></td>
          <td><strong>Optional</strong>. Object.<br /><br />Contains domain\_verification which is used to determine whether domain verification is required, optional, or disabled.<br /><br />Options for domain\_verification include:<br /><br /><ul><li><code>none</code>: Disables domain verification. You can also disable domain verification by leaving the <code>domain\_aliases\_config</code> object out of your request.</li><li><code>optional</code>: Allows customer admins to skip domain verification during setup.</li><li><code>required</code>: Requires customer admins to verify their domain during setup.</li></ul><br />To learn more, review <a href="/docs/authenticate/enterprise-connections/self-service-SSO/manage-self-service-sso#domain-verification-and-home-realm-discovery">Domain Verification and Home Realm Discovery</a>.</td>
        </tr>
      </tbody>
    </table>

    **Example Request Body**

    ```json lines expandable theme={null}
    {
       "connection_config":{
          "name":"string",
          "display_name":"string",
          "is_domain_connection":true,
          "show_as_button":true,
          "metadata":{
             "key1":"value1",
             "key2":"value2"
          },
          "options":{
             "icon_url":"string",
             "domain_aliases":[
                "acme.corp",
                "okta.com"
             ],
             "idpinitiated": { 
                "enabled": true, 
                "client_id": "string", 
                "client_protocol": "string", 
                "client_authorizequery": "string" 
            }
          }
       },
       "enabled_clients":[
          "string"
       ],
       "enabled_organizations":[
          {
             "organization_id":"string",
             "assign_membership_on_login":true,
             "show_as_button":true
          }
       ],
       "ttl_sec":0,
       "domain_aliases_config": {
           "domain_verification": "string"
        }
    }
    ```

    In response, you receive a URL to the self-service access ticket:

    ```json lines theme={null}
    {
      "ticket": "https://{domain}/self-service/connections-flow?ticket={id}"
    }
    ```

    After you receive the ticket URL, share the link with your customer admin to grant them access to the self-service assistant. The assistant will then guide them through configuring the SSO connection. To learn more about that experience, review [Self-service assistant experience](/docs/authenticate/enterprise-connections/self-service-SSO#self-service-assistant-experience).

    You can wrap access ticket generation in your own self-service portal or send ticket URLs directly to customer admins through email, chat, or other communication channels.
  </Tab>
</Tabs>

### Generate access tickets for existing connections

You can generate access tickets for existing connections through either the Auth0 Dashboard or the Management API.

<Warning>
  By default, access ticket URLs remain valid for five days after generation. After accessing the ticket URL, the customer admin has five hours to complete their setup. An access ticket URL can be accessed a maximum of 10 times; once this limit is reached, a new access ticket must be requested.

  If needed, you can revoke an access ticket prior to its expiration to immediately cease access to the self-service assistant.
</Warning>

<Callout icon="file-lines" color="#0EA5E9" iconType="regular">
  If a customer admin initiates **domain verification** through the self-service assistant, they may require an additional access ticket to complete the setup process.

  Domain verification occurs as the final step of the self-service assistant. At this point in the workflow, the connection has been created but not enabled. If domain verification is required, the customer admin cannot enable their connection until verification is complete.

  While verification typically occurs in a timely manner, it may take 24-48 hours in some cases. If this occurs, the customer admin will not be able to use their original access ticket to enable their connection, as tickets expire five hours after they are first accessed.

  To complete this process, you can generate an access ticket that allows the customer admin to modify the connection they configured with their initial ticket. When creating this ticket, ensure you specify the Connection ID of the connection they configured with their first access ticket.
</Callout>

<Tabs>
  <Tab title="Auth0 Dashboard">
    To edit an access ticket through the Auth0 Dashboard:

    1. Navigate to [Authentication > Enterprise](https://manage.auth0.com/#/connections/enterprise) and access the Self-Service SSO section. Then, select the self-service profile with which you want to create an access ticket.

    2. Select **Generate Ticket** to open the ticket form. Under **Select ticket type**, choose **Edit an existing connection**.

    3. Under **Ticket configuration**, provide the ID of the existing connection you want the customer admin to modify.

    4. Select **Next**.

    5. Under **Domain Verification**, choose your desired level of verification:

       1. **Off**: Customer admins are not prompted to verify their domain when setting up SSO. This option is selected by default for new access tickets.
       2. **Optional**: Customer admins are prompted to verify their domain when setting up SSO. However, they can skip this step and enable their connection without completing verification.
       3. **Required**: Customer admins must verify their domain when setting up SSO. They will not be able to enable their connection until verification is complete.

    6. Under **Provisioning**, optionally enable **Sync user profiles using provisioning**. When enabled, additional configuration is available:
       * **Bearer Token Expiration**: Define an expiration date for the SCIM bearer token. By default, bearer tokens do not expire.
       * **Bearer Token Permissions (Scopes)**: Choose which actions the token can perform. By default, all provisioning scopes are enabled:
         * `get:users`
         * `post:users`
         * `put:users`
         * `patch:users`
         * `delete:users`

    7. Under **Time to Live**, set an expiration period for the access ticket in seconds. By default, time to live is set to 432000 seconds (which equals five days).

       A. Time to Live determines how long an access ticket URL is active **before** a customer admin launches the self-service assistant. It does not determine how long the customer admin has access to the assistant after it’s been launched. The expiration of the self-service assistant itself is five hours and cannot be configured.

    8. Review your access ticket configuration for accuracy. Then, select **Create Ticket**.

    A Ticket Information popup containing the access ticket URL then displays. Copy and save this URL somewhere safe as you cannot retrieve this URL again after closing the popup.

    You can share the access ticket URL with your customer admin through email, chat, or another communication channel to grant them access to the self-service assistant. The assistant will then guide them through configuring the SSO connection. To learn more about that experience, review [Self-service assistant experience](/docs/authenticate/enterprise-connections/self-service-SSO#self-service-assistant-experience).
  </Tab>

  <Tab title="Management API">
    To generate an access ticket through the Management API, follow the steps below.

    <Callout icon="file-lines" color="#0EA5E9" iconType="regular">
      You cannot update `connection_config` details for an existing connection through the [SSO Access Ticket](https://auth0.com/docs/api/management/v2/self-service-profiles/post-sso-ticket) endpoint. If you need to modify this information for an existing connection, use the [Update a Connection](https://auth0.com/docs/api/management/v2/connections/patch-connections-by-id) endpoint instead.
    </Callout>

    1. Retrieve the ID of the self-service profile you want to associate with the access ticket through the [Retrieve Self-Service Profiles](https://auth0.com/docs/api/management/v2/self-service-profiles/get-self-service-profiles) endpoint.
    2. Call the [SSO Access Ticket](https://auth0.com/docs/api/management/v2/self-service-profiles/post-sso-ticket) endpoint using the ID of the appropriate self-service profile:

       `POST /api/v2/self-service-profiles/{id}/sso-ticket`

       In the request body, specify the following parameters:

    <table class="table">
      <thead>
        <tr>
          <th><strong>Parameter</strong></th>
          <th><strong>Description</strong></th>
        </tr>
      </thead>

      <tbody>
        <tr>
          <td><code>connection\_id</code></td>
          <td><strong>Required</strong>. String.<br /><br />ID of the connection a customer admin can update through the self-service assistant. Customer admins can modify key elements of the connection, such as the SAML certificate or OIDC ID and secret.<br /><br />Connection IDs can be retrieved through the Authentication section of the <a href="https://manage.auth0.com/#/connections/enterprise">Auth0 Dashboard</a> or the <a href="https://auth0.com/docs/api/management/v2/connections/get-connections">Get All Connections</a> endpoint.\*\*</td>
        </tr>

        <tr>
          <td><code>provisioning\_config</code></td>
          <td> **Optional.** Object. <br /> Determines whether or not customer admin is able to set up SCIM. If the connection is created without all provisioning `scopes`, `get:users`,`post:users`,`put:users`, `patch:users`,`delete:users`, SCIM will not be enabled.</td>
        </tr>

        <tr>
          <td><code>ttl\_sec</code></td>
          <td><strong>Optional</strong>. Number.<br /><br />Number of seconds an access ticket URL remains active before a customer admin launches the self-service assistant. If unspecified or set to <code>0</code>, the value defaults to <code>432000</code> (which equals 5 days). <br /><br />Note that this expiration period does not determine how long a customer admin has access to the self-service assistant after it's been launched. The expiration of the assistant itself is five hours and cannot be configured.</td>
        </tr>

        <tr>
          <td><code>domain\_aliases\_config</code></td>
          <td><strong>Optional</strong>. Object.<br /><br />Contains domain\_verification which is used to determine whether domain verification is required, optional, or disabled.<br /><br />Options for domain\_verification include:<br /><br /><ul><li><code>none</code>: Disables domain verification. You can also disable domain verification by leaving the <code>domain\_aliases\_config</code> object out of your request.</li><li><code>optional</code>: Allows customer admins to skip domain verification during setup.</li><li><code>required</code>: Requires customer admins to verify their domain during setup.</li></ul><br />To learn more, review <a href="/docs/authenticate/enterprise-connections/self-service-SSO/manage-self-service-sso#domain-verification-and-home-realm-discovery">Domain Verification and Home Realm Discovery</a>.</td>
        </tr>
      </tbody>
    </table>

    **Example Request Body**

    ```json lines theme={null}
    {
      "connection_id": "string",
       "ttl_sec":0,
       "domain_aliases_config": {
           "domain_verification": "string"
        }
    }
    ```

    In response, you receive a URL to the self-service access ticket:

    ```json lines theme={null}
    {
      "ticket": "https://{domain}/self-service/connections-flow?ticket={id}"
    }
    ```

    After you receive the ticket URL, share the link with your customer admin to grant them access to the self-service assistant. The assistant will then guide them through configuring the SSO connection. To learn more about that experience, review [Self-service assistant experience](/docs/authenticate/enterprise-connections/self-service-SSO#self-service-assistant-experience).

    You can wrap access ticket generation in your own self-service portal or send ticket URLs directly to customer admins through email, chat, or other communication channels.
  </Tab>
</Tabs>

### Revoke an access ticket

By default, an access ticket URL remains valid for five days. Upon accessing the URL, a customer admin has five hours to complete their setup.

If needed, you can revoke an access ticket prior to its expiration. For example, if an access ticket is shared with the wrong <Tooltip tip="Audience: Unique identifier of the audience for an issued token. Named aud in a token, its value contains the ID of either an application (Client ID) for an ID Token or an API (API Identifier) for an Access Token." cta="View Glossary" href="/docs/glossary?term=audience">audience</Tooltip>, you can revoke the ticket to prevent unauthorized access to the self-service assistant.

When you revoke an access ticket, its URL immediately becomes invalid, and any associated sessions are terminated. Customer admins with the URL will no longer be able to access the self-service assistant. You can then generate and share new access tickets as needed.

To revoke an access ticket:

1. Retrieve the ID of the self-service profile associated with the access ticket using the [Retrieve Self-Service Profiles](https://auth0.com/docs/api/management/v2/self-service-profiles/get-self-service-profiles) endpoint.
2. Locate the ID of the access ticket you wish to revoke. IDs can be found at the end of the access ticket URL.
3. Call the [Revoke SSO Access Ticket](https://auth0.com/docs/api/management/v2/self-service-profiles/post-revoke) endpoint using the appropriate IDs:

`POST  /api/v2/self-service-profiles/{id}/sso-ticket/{id}/revoke`

In response, a `202 Accepted` is returned.

## References

### APIs

To manage Self-Service SSO, the following [Management API](https://auth0.com/docs/api/management/v2/introduction) endpoints are available:

* [Get self-service profiles](https://auth0.com/docs/api/management/v2/self-service-profiles/get-self-service-profiles)
* [Create a self-service profile](https://auth0.com/docs/api/management/v2/self-service-profiles/post-self-service-profiles)
* [Get a self-service profile by ID](https://auth0.com/docs/api/management/v2/self-service-profiles/get-self-service-profiles-by-id)
* [Delete a self-service profile by ID](https://auth0.com/docs/api/management/v2/self-service-profiles/delete-self-service-profiles-by-id)
* [Update a self-service profile](https://auth0.com/docs/api/management/v2/self-service-profiles/patch-self-service-profiles-by-id)
* [Get custom text for a self-service profile](https://auth0.com/docs/api/management/v2/self-service-profiles/get-self-service-profile-custom-text)
* [Set custom text for a self-service profile](https://auth0.com/docs/api/management/v2/self-service-profiles/put-self-service-profile-custom-text)
* [Create an SSO-access ticket to initiate the self-service SSO flow](https://auth0.com/docs/api/management/v2/self-service-profiles/post-sso-ticket)
* [Revoke an SSO access ticket](https://auth0.com/docs/api/management/v2/self-service-profiles/post-revoke)

### Rate Limits

When using Self-Service SSO, the following rate limits apply:

<table class="table">
  <thead>
    <tr>
      <th>Description</th>
      <th>Endpoint</th>
      <th>Limits</th>
    </tr>
  </thead>

  <tbody>
    <tr>
      <td>Manage SSO profiles</td>
      <td><code>/api/v2/self-service-profiles</code></td>
      <td>Review the <a href="/docs/troubleshoot/customer-support/operational-policies/rate-limit-policy/rate-limit-configurations">Management API rate limits</a> for your subscription type.</td>
    </tr>

    <tr>
      <td>Create an access ticket</td>
      <td><code>/api/v2/self-service-profiles/{id}/sso-ticket</code></td>
      <td>Review the <a href="/docs/troubleshoot/customer-support/operational-policies/rate-limit-policy/rate-limit-configurations">Management API rate limits</a> for your subscription type.</td>
    </tr>

    <tr>
      <td>Consume an access ticket</td>
      <td><code>/self-service/connection-flows?ticket={id}</code></td>
      <td>6 / min / IP</td>
    </tr>

    <tr>
      <td>Load the webapp (including setup assistant) and webapp endpoints</td>
      <td><code>/self-service/\*</code></td>
      <td>50 / min / IP<br />90 / min / tenant</td>
    </tr>
  </tbody>
</table>
