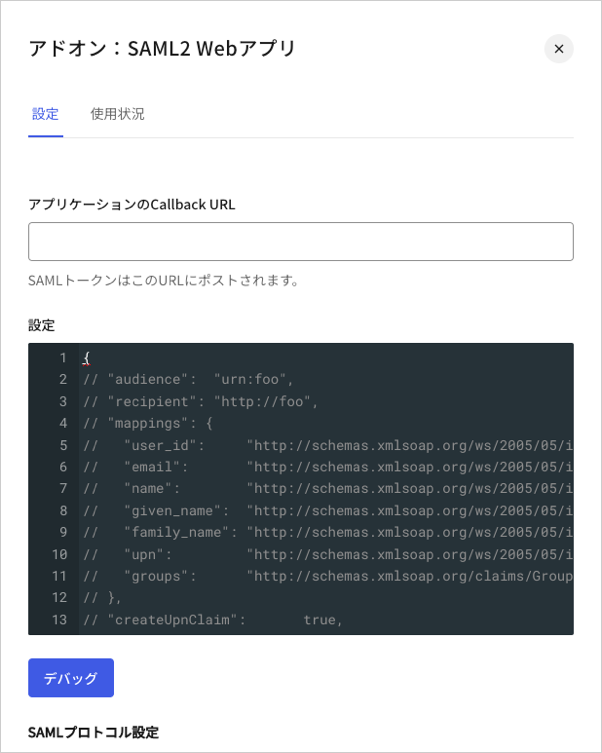
 4. 以下のコードを **[Settings(設定)]** テキストボックスに貼り付け、 **[Debug(デバッグ)]** をクリックします。
```json lines theme={null}
{
"audience": "{yourGitHubServerUrl}",
"mappings": {
"user_id": "http://schemas.xmlsoap.org/ws/2005/05/identity/claims/nameidentifier",
"email": "emails",
"name": "full_name"
},
"passthroughClaimsWithNoMapping": false,
"mapIdentities": false,
"signatureAlgorithm": "rsa-sha256",
"digestAlgorithm": "sha256",
"nameIdentifierProbes": [
"http://schemas.xmlsoap.org/ws/2005/05/identity/claims/nameidentifier"
]
}
```
`{yourGitHubOrgName}`をGitHubサブスクリプションに対応するGitHubの組織名で置き換えます。例:`https://github.yourname.com`
1. 上にあるマッピングは、`user_id`を **[Name Identifier(名前識別子)]** としてGitHubに送信します。GitHubアプリケーションに1つ以上の接続を有効化する場合には、このオプションを使用して、確実に一意になるようにします(ユーザーがそれぞれ異なるIDを持つようになります)。
2. 使用する接続が1つだけの場合には、`nickname`(ニックネーム)などの一意の識別子を分かりやすい **[Name Identifier(名前識別子)]** として使用しても構いませんが、そのプロパティが一意であることを必ず確認してください。
5. タブの最後までスクロールし、 **[Enable(有効)]** をクリックします。
6. **[Usage(使用状況)]** タブで **[Identity Provider Metadata(IDプロバイダーのメタデータ)]** を見つけ、 **[Download(ダウンロード)]** をクリックしてメタデータファイルをダウンロードします。これは、Auth0をIDプロバイダーとして構成する際に必要になります。
4. 以下のコードを **[Settings(設定)]** テキストボックスに貼り付け、 **[Debug(デバッグ)]** をクリックします。
```json lines theme={null}
{
"audience": "{yourGitHubServerUrl}",
"mappings": {
"user_id": "http://schemas.xmlsoap.org/ws/2005/05/identity/claims/nameidentifier",
"email": "emails",
"name": "full_name"
},
"passthroughClaimsWithNoMapping": false,
"mapIdentities": false,
"signatureAlgorithm": "rsa-sha256",
"digestAlgorithm": "sha256",
"nameIdentifierProbes": [
"http://schemas.xmlsoap.org/ws/2005/05/identity/claims/nameidentifier"
]
}
```
`{yourGitHubOrgName}`をGitHubサブスクリプションに対応するGitHubの組織名で置き換えます。例:`https://github.yourname.com`
1. 上にあるマッピングは、`user_id`を **[Name Identifier(名前識別子)]** としてGitHubに送信します。GitHubアプリケーションに1つ以上の接続を有効化する場合には、このオプションを使用して、確実に一意になるようにします(ユーザーがそれぞれ異なるIDを持つようになります)。
2. 使用する接続が1つだけの場合には、`nickname`(ニックネーム)などの一意の識別子を分かりやすい **[Name Identifier(名前識別子)]** として使用しても構いませんが、そのプロパティが一意であることを必ず確認してください。
5. タブの最後までスクロールし、 **[Enable(有効)]** をクリックします。
6. **[Usage(使用状況)]** タブで **[Identity Provider Metadata(IDプロバイダーのメタデータ)]** を見つけ、 **[Download(ダウンロード)]** をクリックしてメタデータファイルをダウンロードします。これは、Auth0をIDプロバイダーとして構成する際に必要になります。
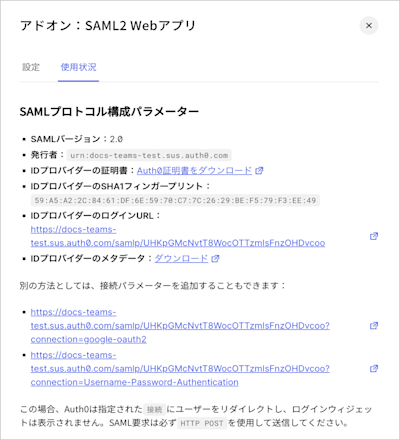
| フィールド | エントリ |
|---|---|
| Sign On URL(サインオンURL) | Auth0で作成した直後のGitHubアプリケーションの`client_id`は`https://{yourDomain}/samlp/{CLIENT_ID}` `{CLIENT_ID}`になります。 |
| Issuer(発行者) | `urn:auth0:{yourTenant}` |
| Verification Certificate(検証証明書) | `https://{yourDomain}/pem`からダウンロードします。ダウンロードしたファイルをテキストエディターで開き、中身をコピーしてからGitHubのテキスト領域に貼り付けます。 |
| User Attributes(ユーザー属性) | デフォルトのままにしておきます。SAML Webアプリアドオンで構成したマッピングでは、GitHubが指定するデフォルトの属性名が使用されます。 |
| Signature method(署名メソッド) | `RSA256-SHA256` |
| Digest method(ダイジェストメソッド) | `SHA256` |