> ## Documentation Index
> Fetch the complete documentation index at: https://auth0.generaltranslation.app/llms.txt
> Use this file to discover all available pages before exploring further.
> モバイルプッシュ通知を使用して、Client-Initiated Backchannel Authentication フローでユーザーを認証する方法を説明します。
# CIBA を使用したモバイルプッシュ通知
Client-Initiated Backchannel Authentication (CIBA) 機能を使用するには、Enterprise プランまたは適切なアドオンが必要です。詳細については、[Auth0 Pricing](https://auth0.com/pricing/) を参照してください。
CIBA とモバイルプッシュ通知を併用すると、登録済みのモバイルデバイスに、認証またはリクエストの承認を行うためのプッシュ通知が送信されます。CIBA でモバイルプッシュ通知を送信するには、Auth0 Guardian アプリ、または Auth0 Guardian ソフトウェア開発キット (SDK) と統合されたカスタムアプリを使用できます。
モバイルプッシュ通知を使用した CIBA フローでは、ブラウザーを使用せずに、モバイルデバイス上でユーザーを認証および認可します。利用側のデバイスでアクティブなブラウザーセッションが不要なため、CIBA リクエストがトリガーされる前に、ユーザーがログインしておく必要はありません。また、これにより CIBA フローがユーザーの既存のセッションに影響を与えないことも保証されます。
次の図は、モバイルプッシュ通知を使用した CIBA のエンドツーエンドフローを示しています。
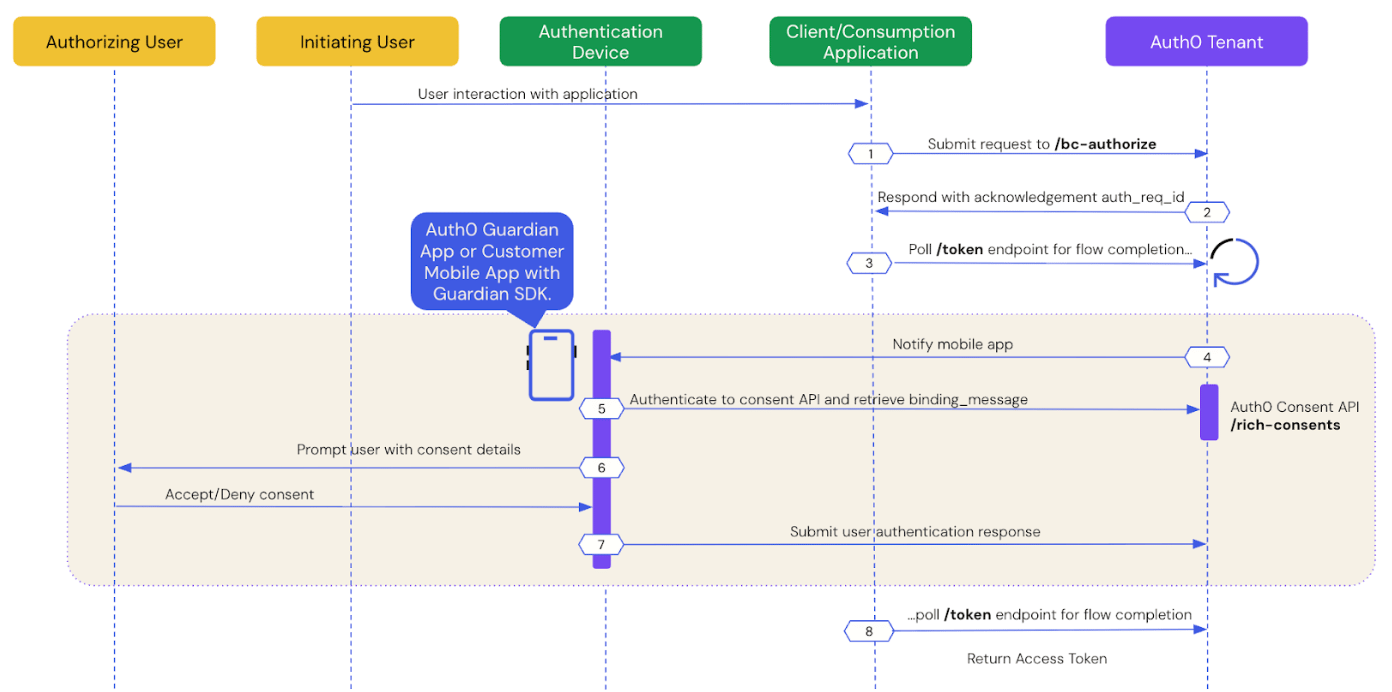 以下のセクションでは、モバイルプッシュ通知を使用した CIBA におけるユーザー認証の動作について、ステップごとに詳しく説明します。
* [前提条件](#prerequisites)
* [ステップ 1: クライアントアプリケーションが CIBA リクエストを開始する](#step-1%3A-client-application-initiates-a-ciba-request)
* [ステップ 2: Auth0 テナントが CIBA リクエストを受け付ける](#step-2%3A-auth0-tenant-acknowledges-the-ciba-request)
* [ステップ 3: クライアントアプリケーションがレスポンスをポーリングする](#step-3%3A-client-application-polls-for-a-response)
* [ステップ 4: モバイルアプリケーションがプッシュ通知を受信する](#step-4%3A-mobile-application-receives-the-push-notification)
* [ステップ 5: モバイルアプリケーションが同意の詳細を取得する](#step-5%3A-mobile-application-retrieves-the-consent-details)
* [ステップ 6: モバイルアプリケーションが同意の詳細をユーザーに表示する](#step-6%3A-mobile-application-presents-the-consent-details-to-the-user)
* [ステップ 7: モバイルアプリケーションがユーザーのレスポンスを Auth0 に送信する](#step-7%3A-mobile-application-sends-the-user-response-back-to-auth0)
* [ステップ 8: フロー完了後に Auth0 がユーザーのレスポンスを受信する](#step-8%3A-auth0-receives-user-response-after-the-flow-completes)
* [ステップ 9: Auth0 がアクセストークンをクライアントアプリケーションに返す](#step-9%3A-auth0-returns-access-token-to-client-application)
以下のセクションでは、モバイルプッシュ通知を使用した CIBA におけるユーザー認証の動作について、ステップごとに詳しく説明します。
* [前提条件](#prerequisites)
* [ステップ 1: クライアントアプリケーションが CIBA リクエストを開始する](#step-1%3A-client-application-initiates-a-ciba-request)
* [ステップ 2: Auth0 テナントが CIBA リクエストを受け付ける](#step-2%3A-auth0-tenant-acknowledges-the-ciba-request)
* [ステップ 3: クライアントアプリケーションがレスポンスをポーリングする](#step-3%3A-client-application-polls-for-a-response)
* [ステップ 4: モバイルアプリケーションがプッシュ通知を受信する](#step-4%3A-mobile-application-receives-the-push-notification)
* [ステップ 5: モバイルアプリケーションが同意の詳細を取得する](#step-5%3A-mobile-application-retrieves-the-consent-details)
* [ステップ 6: モバイルアプリケーションが同意の詳細をユーザーに表示する](#step-6%3A-mobile-application-presents-the-consent-details-to-the-user)
* [ステップ 7: モバイルアプリケーションがユーザーのレスポンスを Auth0 に送信する](#step-7%3A-mobile-application-sends-the-user-response-back-to-auth0)
* [ステップ 8: フロー完了後に Auth0 がユーザーのレスポンスを受信する](#step-8%3A-auth0-receives-user-response-after-the-flow-completes)
* [ステップ 9: Auth0 がアクセストークンをクライアントアプリケーションに返す](#step-9%3A-auth0-returns-access-token-to-client-application)
## 前提条件
Auth0 を使用して CIBA プッシュリクエストを開始するには、次の条件を満たす必要があります。
* テナントとアプリケーションに対して、[Client-Initiated Backchannel Authentication を構成](/docs/ja-JP/get-started/applications/configure-client-initiated-backchannel-authentication)し、[モバイルプッシュ通知](/docs/ja-JP/get-started/applications/configure-client-initiated-backchannel-authentication/#configure-mobile-push-notifications)も含めて設定します。
* `requested_expiry` パラメーターを、秒単位で 300 以下の値に設定します。詳細については、[通知チャネルの構成](/docs/ja-JP/get-started/applications/configure-client-initiated-backchannel-authentication#configure-notification-channel)を参照してください。
## ステップ 1: クライアント アプリケーションが CIBA リクエストを開始する
[User Search APIs](/docs/ja-JP/manage-users/user-search) を使用して、CIBA リクエストを開始したい対象の認可ユーザーを検索し、そのユーザーの user ID を取得します。
認可ユーザーの user ID を取得したら、Authentication API または Auth0 の [SDK](/docs/ja-JP/libraries) を使用して、`/bc-authorize` エンドポイントに CIBA リクエストを送信します。
```bash lines theme={null}
curl --location 'https://{yourDomain}.auth0.com/bc-authorize' \
--header 'Content-Type: application/x-www-form-urlencoded' \
--data-urlencode 'client_id=' \
--data-urlencode 'client_secret=' \
--data-urlencode 'login_hint={ "format": "iss_sub", "iss": "https://{yourDomain}.auth0.com/", "sub": "" }' \
--data-urlencode 'scope=' \
--data-urlencode 'binding_message='
```
```csharp lines theme={null}
var response = await authenticationApiClient.ClientInitiatedBackchannelAuthorization(
new ClientInitiatedBackchannelAuthorizationRequest()
{
ClientId = "",
Scope = "openid",
ClientSecret = "",
BindingMessage = "",
LoginHint = new LoginHint()
{
Format = "iss_sub",
Issuer = "https://{yourDomain}.auth0.com/",
Subject = ""
}
}
);
```
```go lines theme={null}
resp, err := authAPI.CIBA.Initiate(context.Background(), ciba.Request{
ClientID: mgmtClientID,
ClientSecret: mgmtClientSecret,
Scope: "openid",
LoginHint: map[string]string{
"format": "iss_sub",
"iss": "https://{yourDomain}.auth0.com/",
"sub": "",
},
BindingMessage: "",
})
```
```java lines theme={null}
// AuthClient インスタンスを作成
AuthAPI auth = AuthAPI.newBuilder(domain, clientId, clientSecret).build();
// 認可
Map loginHint = new HashMap<>();
loginHint.put("format", "iss_sub");
loginHint.put("iss", "https://{yourDomain}.auth0.com/");
loginHint.put("sub", "");
Request request = auth.authorizeBackChannel("openid", "", loginHint);
BackChannelAuthorizeResponse resp = request.execute().getBody();
```
| パラメーター |
説明 |
tenant |
テナント名。カスタムドメインを指定することもできます。iss\_sub フォーマットが使用されている場合、テナント名は iss クレーム内で渡されます。 |
client\_id |
クライアントアプリケーションの識別子。 |
client\_secret |
CIBA を用いたユーザー認証に使用されるクライアント認証方式。例: クライアントシークレット、Private Key JWT、mTLS Authentication など。Private Key JWT または mTLS を使用する場合、クライアントシークレットを含める必要はありません。 |
scope |
openid を必ず含める必要があります。
スコープには任意で offline\_access を含めてリフレッシュトークンを要求できます。ただし、CIBA Flow によるトランザクションのワンタイム認可では、リフレッシュトークンは不要であり、このコンテキストでは意味を持ちません。
|
user\_id |
login\_hint 構造内で渡される、認可を行うユーザーのユーザー ID。iss\_sub フォーマットが使用されている場合、ユーザー ID は sub クレーム内で渡されます。
ユーザー ID の形式は、外部プロバイダによって異なる場合があります。
|
requested\_expiry |
CIBA セッションを有効にしておく最大時間(秒)。CIBA フローの requested expiry は 1 ~ 259200 秒(72 時間)の範囲で指定でき、デフォルトは 300 秒です。CIBA フローにカスタムの有効期限を設定するには、requested\_expiry パラメータを含めてください。
requested\_expiry パラメータは、CIBA が使用する通知チャネルを決定する際に役立ちます。requested\_expiry を 300 秒以下の値に設定した場合、CIBA は有効化されている場合はモバイルプッシュ通知チャネルを使用します。テナントで MFA が設定されていない場合、CIBA リクエストは失敗します。requested\_expiry を 301 ~ 259200 秒(72 時間)の範囲の値に設定した場合、CIBA は有効化されている場合はメール通知チャネルを使用します。
|
binding\_message |
認証デバイスと利用デバイス間で CIBA フローを関連付けるために使用される、人間が読めるメッセージ。binding\_message は必須で、最大 64 文字まで指定できます。英数字と +-\_.,:# の文字のみを使用してください。 |
認可を行うユーザーごとに、1 分あたり 5 件を超えるリクエストは送信されないレート制限があります。
## ステップ 2: Auth0 テナントが CIBA リクエストを受け付ける
Auth0 テナントが `POST` リクエストを正常に受信すると、そのリクエストを参照する `auth-req-id` を含んだレスポンスが返されます。
```json lines theme={null}
{
"auth_req_id": "eyJh...",
"expires_in": 300,
"interval": 5
}
```
`auth_req_id` の値は、CIBA フローの完了をポーリングするために `/token` エンドポイントに渡されます。
## Step 3: クライアントアプリケーションがレスポンスをポーリングする
Authentication API または Auth0 の [SDKs](/docs/ja-JP/libraries) を使用して、`urn:openid:params:grant-type:ciba` グラントタイプと、`/bc-authorize` エンドポイントから受け取った `auth_req_id` を使って `/token` エンドポイントを呼び出します。
```bash lines theme={null}
curl --location 'https://$tenant.auth0.com/oauth/token' \
--header 'Content-Type: application/x-www-form-urlencoded' \
--data-urlencode 'client_id=' \
--data-urlencode 'client_secret=' \
--data-urlencode 'auth_req_id=' \
--data-urlencode 'grant_type=urn:openid:params:grant-type:ciba'
```
```csharp lines theme={null}
var token = await authenticationApiClient.GetTokenAsync(
new ClientInitiatedBackchannelAuthorizationTokenRequest()
{
AuthRequestId = response.AuthRequestId,
ClientId = "",
ClientSecret = ""
}
);
```
```go lines theme={null}
token, err := authAPI.OAuth.LoginWithGrant(context.Background(),
"urn:openid:params:grant-type:ciba",
url.Values{
"auth_req_id": []string{resp.AuthReqID},
"client_id": []string{clientID},
"client_secret": []string{clientSecret},
},
oauth.IDTokenValidationOptions{})
```
```java lines theme={null}
Request tokenRequest = auth.getBackChannelLoginStatus(authReqId, "grant-type");
BackChannelTokenResponse tokenResponse = tokenRequest.execute().getBody();
```
認可を行うユーザーがトランザクションを承認するまでの間は、次のレスポンスが返されます。
```json lines theme={null}
{
"error": "authorization_pending",
"error_description": "エンドユーザーの認可が保留中です"
}
```
ポーリングの待機間隔は約 5 秒です。頻繁にポーリングしすぎると、次のようなレスポンスを受け取ります。`description` の内容は、バックオフ間隔に応じて変化します。
```json lines theme={null}
{
"error": "slow_down",
"error_description": "許可された頻度を超えてポーリングしています。10秒後に再試行してください。"
"interval": 10
}
```
エラーを解消するには、次のポーリング間隔(秒)まで待ってから `/token` エンドポイントのポーリングを行ってください。
## ステップ 4: モバイルアプリケーションがプッシュ通知を受信する
Auth0 は、Auth0 Guardian アプリ、または [Auth0 Guardian SDK](/docs/ja-JP/secure/multi-factor-authentication/auth0-guardian) と統合されたカスタムアプリを介して、ユーザーが登録したモバイルアプリまたはデバイスにプッシュ通知を送信します。
カスタムアプリを使用している場合、[Auth0 Guardian SDK](/docs/ja-JP/secure/multi-factor-authentication/auth0-guardian) は、プッシュ通知から受信したデータを解析し、すぐに使用できる `Notification` インスタンスを返すためのメソッドを提供します。`Notification` インスタンスには、トランザクションを関連付けるための ID(`txlinkid`)が含まれており、モバイルアプリケーションはこの ID を使用して Auth0 から同意の詳細を取得します。
次のコードサンプルは、Guardian SDK を使用した iOS および Android 向けモバイルプッシュ通知実装の例です。
```swift lines theme={null}
// UNUserNotificationCenterDelegate を実装
func userNotificationCenter(_ center: UNUserNotificationCenter, willPresent notification: UNNotification, withCompletionHandler completionHandler: (UNNotificationPresentationOptions) -> Void) {
let userInfo = notification.request.content.userInfo
if let notification = Guardian.notification(from: userInfo) {
// この関数を実装してプロンプトを表示し、ユーザーの同意または拒否を処理します。
handleGuardianNotification(notification: notification)
}
}
```
```kotlin lines theme={null}
// FCM リスナーで RemoteMessage を受信します
@Override
public void onMessageReceived(RemoteMessage message) {
Notification notification = Guardian.parseNotification(message.getData());
if (notification != null) {
// Guardian 通知を受信したので処理します
handleGuardianNotification(notification);
return;
}
/* 使用している他のプッシュ通知をここで処理します… */
}
```
## ステップ 5: モバイルアプリケーションが同意の詳細を取得する
Auth0 Guardian アプリ、または Auth0 Guardian SDK と統合されたカスタムアプリは、Auth0 Consent API から、つまり `binding_message` の内容である同意の詳細を取得します。
カスタムアプリを使用している場合、次のコードサンプルは Auth0 Consent API からデータを取得する iOS と Android の実装例です。
```swift lines theme={null}
let device: AuthenticationDevice = // 初回の Guardian SDK 登録プロセス中に取得し、ローカルに保存しておいたオブジェクト
if let consentId = notification.transactionLinkingId {
Guardian
.consent(forDomain: {yourTenantDomain}, device: device)
.fetch(consentId: consentId, notificationToken: notification.transactionToken)
.start{result in
switch result {
case .success(let payload):
// ユーザーに同意内容を表示する
case .failure(let cause):
// 何らかの問題が発生した
}
}
}
```
```kotlin lines theme={null}
Enrollment enrollment = // 初回の Guardian SDK 登録プロセス中に取得し、ローカルに保存しておいたオブジェクト
if (notification.getTransactionLinkingId() != null) {
guardian
.fetchConsent(notification, enrollment)
.start(new Callback {
@Override
void onSuccess(RichConsent consentDetails) {
// ユーザーに同意内容を表示する
}
@Override
void onFailure(Throwable exception) {
// 何らかの問題が発生した
}
});
}
```
## ステップ 6: モバイルアプリケーションがユーザーに同意内容を提示する
Auth0 Consent API は、`binding_message`、`scope`、`audience` を含む同意内容を、Auth0 Guardian アプリまたは Auth0 Guardian ソフトウェア開発キット (SDK) と統合されたカスタムアプリに応答として返します。モバイルアプリケーションに返されるスコープは、RBAC ポリシーに基づいてフィルタリングされます。詳細は、[ロールベースのアクセス制御](/docs/ja-JP/manage-users/access-control/rbac) を参照してください。
モバイルアプリケーションは、認証リクエストまたは同意内容、あるいはその両方をユーザーに提示します。
次のコードサンプルは、Auth0 Consent API からのレスポンス例です。
```json lines theme={null}
{
"id": "cns_abc123",
"requested_details": {
"audience": "https://$tenant.auth0.com/userinfo",
"scope": ["openid"],
"binding_message": "21-49-38"
},
"created_at": 1746693720
"expires_at": 1746693750
}
```
この時点で、ユーザーは認証リクエストを承認するか拒否するかを選択できます。
## ステップ 7: モバイル アプリケーションがユーザーからの応答を Auth0 に送信する
Auth0 Guardian アプリまたはカスタムアプリが、ユーザーからの応答を Auth0 に送信します。
Auth0 Guardian ソフトウェア開発キット (SDK) と連携したカスタムアプリを使用している場合、以下のコードサンプルは、ユーザーからの応答を処理する iOS および Android 向けの実装例です。
### ユーザーが認証リクエストを許可する
```swift lines theme={null}
Guardian
.authentication(forDomain: "{yourTenantDomain}", device: device)
.allow(notification: notification)
// または reject(notification: notification, withReason: "hacked")
.start { result in
switch result {
case .success:
// 認証リクエストは正常に拒否されました
case .failure(let cause):
// 失敗しました。cause を確認して原因を特定してください
}
}
```
```kotlin lines theme={null}
guardian
.allow(notification, enrollment)
.execute(); // または start(new Callback<> ...)
```
### ユーザーが認証リクエストを拒否する
```swift lines theme={null}
Guardian
.authentication(forDomain: "{yourTenantDomain}", device: device)
.reject(notification: notification)
// または reject(notification: notification, withReason: "hacked")
.start { result in
switch result {
case .success:
// 認証リクエストは正常に拒否されました
case .failure(let cause):
// 何かが失敗しました。原因(cause)を確認して、何が問題かを特定してください
}
}
```
```kotlin lines theme={null}
guardian
.reject(notification, enrollment) // または reject(notification, enrollment, reason)
.execute(); // または start(new Callback<> ...)
```
## ステップ 8: フロー完了後に Auth0 がユーザーの応答を受信する
クライアントアプリケーションは、`/token` エンドポイントからの応答を受信すると、ポーリングを終了します。CIBA フローでは、常に認可を行うユーザーからの承認または拒否のいずれかの応答が必要であり、既存の認可グラントは考慮されません。
## ステップ 9: Auth0 がクライアントアプリケーションにアクセストークンを返す
ユーザーがプッシュリクエストを拒否した場合、Auth0 は次のようなエラーレスポンスをクライアントアプリケーションに返します。
```json lines theme={null}
{
"error": "access_denied",
"error_description": "エンドユーザーが認可リクエストを拒否したか、リクエストの有効期限が切れています"
}
```
ユーザーがプッシュリクエストを承認すると、Auth0 は次のような アクセストークン をクライアントアプリケーションに返します。
```json lines theme={null}
{
"access_token": "eyJh...",
"id_token": "eyJh...",
"expires_in": 86400,
"scope": "openid",
"token_type": "Bearer"
}
```
`refresh_token` は、最初の `/bc-authorize` リクエストに `offline_access` スコープが含まれていた場合にのみ返されます。
## さらに詳しく
* [クライアント起点バックチャネル認証フロー](/docs/ja-JP/get-started/authentication-and-authorization-flow/client-initiated-backchannel-authentication-flow)
* [クライアント起点バックチャネル認証の設定](/docs/ja-JP/get-started/applications/configure-client-initiated-backchannel-authentication)