> ## Documentation Index
> Fetch the complete documentation index at: https://auth0.generaltranslation.app/llms.txt
> Use this file to discover all available pages before exploring further.
> アプリケーションにM2Mアクセスを認可する方法について説明します。
# M2Mアクセスを認可する
export const AuthCodeBlock = ({filename, icon, language, highlight, children}) => {
const [processedChildren, setProcessedChildren] = useState(children);
useEffect(() => {
let unsubscribe = null;
function init() {
unsubscribe = window.autorun(() => {
let processedChildren = children;
for (const [key, value] of window.rootStore.variableStore.values.entries()) {
processedChildren = processedChildren.replace(new RegExp(key, "g"), value);
}
setProcessedChildren(processedChildren);
});
}
if (window.rootStore) {
init();
} else {
window.addEventListener("adu:storeReady", init);
}
return () => {
window.removeEventListener("adu:storeReady", init);
unsubscribe?.();
};
}, [children]);
return
{processedChildren}
;
};
export const codeExample = `curl -X POST --location "https://{yourDomain}/api/v2/organizations/{ORG_id}/client-grants" \\
--header 'authorization: Bearer MGMT_API_ACCESS_TOKEN' \\
--header 'content-type: application/json' \\
--data '{
"grant_id": "GRANT_ID"
}'
`;
アプリケーションにマシンツーマシンのアクセスを認可するには、特定のAPIのある組織を使用できるようにしなければなりません。これを行うには、アプリケーションのクライアント付与を、組織の対応するAPIに関連付ける必要があります。関連付けると、アプリケーションは組織を使用して、APIのトークンとクライアント付与で定義済みのスコープを要求することができます。この関連付けは、アプリケーションが組織へのアクセスに必要なAPIのそれぞれについて定義しなければなりません。
アプリケーションのM2Mアクセスは、[Auth0 Dashboard](https://manage.auth0.com/)または[Management API](https://auth0.com/docs/api/management/v2)を使って認可できます。
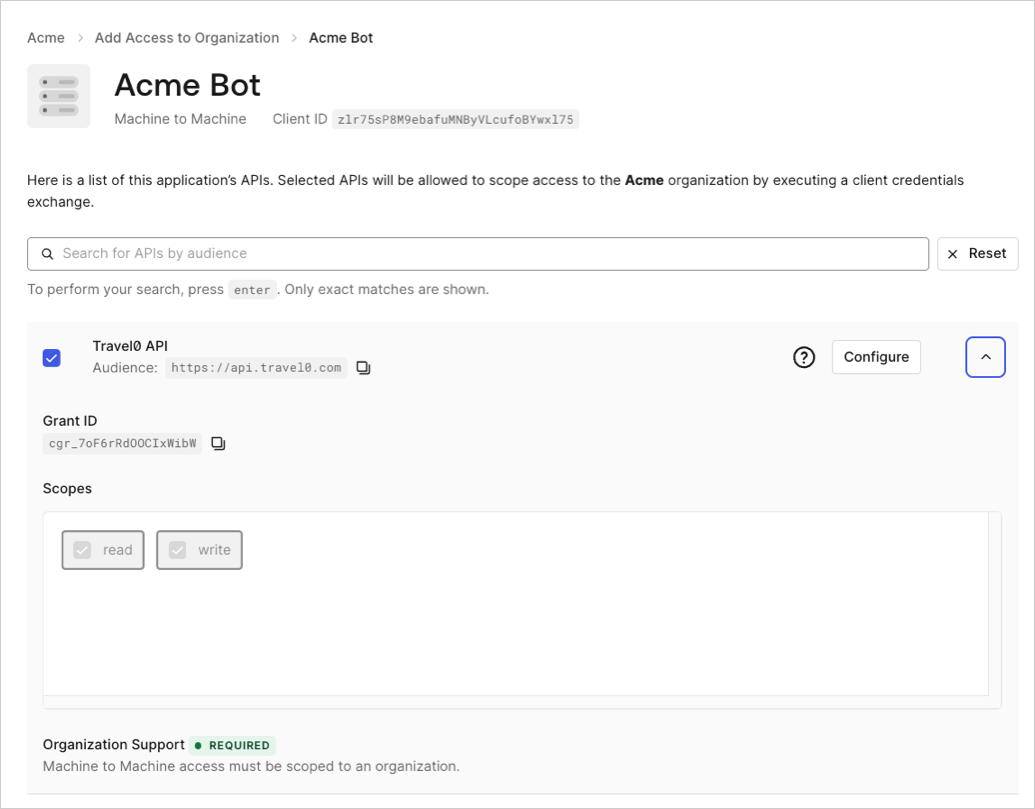
Auth0ダッシュボードでアプリケーションのクライアントの許可を組織に関連付ける方法:
1. **[Organizations(組織)]** に移動し、関連付ける組織を選択します。
2. **[Machine-to-Machine Access(マシンツーマシンアクセス)]** タブを選択します。
3. **[Add Access(アクセスを追加)]** をクリックします。
4. 組織に関連付けるアプリケーションをクリックします。
5. APIを選択します。
6. **[Save(保存)]** をクリックします。
 アプリケーションクライアントの許可は、[クライアント許可を組織に関連付ける](https://auth0.com/docs/api/management/v2/organizations/create-organization-client-grants)エンドポイントを介して組織に関連付けることができます。