> ## Documentation Index
> Fetch the complete documentation index at: https://auth0.generaltranslation.app/llms.txt
> Use this file to discover all available pages before exploring further.

# Guardian.swift iOS SDK

> Guardian.swift iOS SDKのインストール方法、使用方法、オプションの構成方法について説明します。

<Callout icon="file-lines" color="#0EA5E9" iconType="regular">
  この機能は廃止されているため、日本語のUIスクリーンショットは利用できません。
</Callout>

<div id="requirements">
  ## 要件
</div>

* Guardianを使用するにはiOS 10+とSwift 4.1が必要です。
* このSDKを使用するには、テナントのGuardianサービスに独自のプッシュ通知資格情報を構成する必要があります。そうしないと、プッシュ通知が届きません。詳細については、「[MFAにプッシュ通知を構成する](/docs/ja-JP/ja-jp/secure/multi-factor-authentication/multi-factor-authentication-factors/configure-push-notifications-for-mfa)」を参照してください。

<div id="install-guardian-ios-sdk">
  ## Guardian iOS SDKをインストールする
</div>

<div id="cocoapods">
  ### CocoaPods
</div>

Guardian.swiftは[CocoaPods](http://cocoapods.org)から入手可能です。インストールするには、以下の行をPodfileに追加します。

```lines theme={null}
pod 'Guardian', '~> 1.1.0'
```

<div id="carthage">
  ### Carthage
</div>

以下の行をCartfileに追加します。

```lines theme={null}
github "auth0/Guardian.swift" ~> 1.1.0
```

<div id="enable-guardian-push-notifications">
  ## Guardianプッシュ通知を有効にする
</div>

1. [［Dashboard］ > ［Security（セキュリティ）］ > ［Multi-factor Auth（多要素認証）］](https://manage.auth0.com/#/guardian)に進みます。
2. **［Push Notification（プッシュ通知）］** を切り替えて有効にします。
3. [プッシュ通知を構成します](https://auth0.com/docs/secure/multi-factor-authentication/multi-factor-authentication-factors/configure-push-notifications-for-mfa#configure-push-notifications-for-apple-using-apn-)。

<div id="usage">
  ## Usage（使用）
</div>

`Guardian`はSDKの中核です。SDKを使用するには、ライブラリをインポートします。

```swift lines theme={null}
import Guardian
```

テナントのドメインを設定します。または、テナントにカスタムドメインを構成している場合、それを使用します。

```swift lines theme={null}
let domain = "<tenant>.<region>.auth0.com"
```

<div id="enroll">
  ### 登録
</div>

登録は、第二要素とAuth0アカウント間のリンクです。アカウントが登録されると、本人確認に必要な第二要素を提供するためにアカウントが必要になります。アプリがまだプッシュ通知を使用していない場合、またはプッシュ通知に慣れていない場合、「[Appleプッシュ通知サービスの概要](https://developer.apple.com/go/?id=push-notifications)」を参照してください。

登録には、テナントのドメイン以外に以下の情報が必要です。

<table class="table">
  <thead>
    <tr>
      <th>変数</th>
      <th>説明</th>
    </tr>
  </thead>

  <tbody>
    <tr>
      <td><strong>Enrollment URI（登録URI）</strong></td>
      <td>Guardian WebウィジェットからスキャンしたQRコード、またはメールかSMS経由で送られてきた登録チケットにエンコードされた値。</td>
    </tr>

    <tr>
      <td><strong>APNS Token（APNSトークン）</strong></td>
      <td>デバイスのApple APNSトークン。64バイト（16進数形式）を含む文字列で指定する必要があります。</td>
    </tr>

    <tr>
      <td><strong>Key Pair（鍵ペア）</strong></td>
      <td>Auth0 GuardianでIDをアサ―トするのに使用するRSA（秘密/公開）鍵ペア。</td>
    </tr>
  </tbody>
</table>

情報を入手した後、デバイスを登録できます。

```swift lines theme={null}
Guardian
        .enroll(forDomain: "{yourTenantDomain}",
                usingUri: "{enrollmentUri}",
                notificationToken: "{apnsToken}",
                signingKey: signingKey,
                verificationKey: verificationKey
                )
        .start { result in
            switch result {
            case .success(let enrolledDevice):
                // success, we have the enrollment device data available
            case .failure(let cause):
                // something failed, check cause to see what went wrong
            }
        }
```

成功すると、登録情報を取得できます。その登録情報は、アプリケーションにセキュアに保存する必要があります。この情報には、登録識別子と、登録を更新または削除するためにデバイスに関連付けられたGuardian APIのトークンが含まれます。

<div id="signing-and-verification-keys">
  #### 署名キーと検証キー
</div>

Guardian.swiftは、署名鍵を生成するための便利なクラスを提供しています。

```swift lines theme={null}
let signingKey = try DataRSAPrivateKey.new()
```

このキーはメモリ内にしか存在しません、`データ`表現を取得し、暗号化されたSQLiteDBなどにセキュアに保存できます。

```swift lines theme={null}
// Store data
let data = signingKey.data
// perform the storage

// Load from Storage
let loadedKey = try DataRSAPrivateKey(data: data)
```

しかし、iOSキーチェーンに保存したいだけなら、以下の手順で可能です。

```swift lines theme={null}
let signingKey = try KeychainRSAPrivateKey.new(with: "com.myapp.mytag")
```

上記の例では、キーを作成し、与えられたタグの下に自動的に保存します。それを取得したい場合、タグを使用できます。

```swift lines theme={null}
let signingKey = try KeychainRSAPrivateKey(tag: "com.myapp.mytag")
```

検証キーは、`SigningKey`から取得できます。以下の例を挙げます。

```swift lines theme={null}
let verificationKey = try signingKey.verificationKey()
```

<div id="allow-login-requests">
  ### ログイン要求を許可する
</div>

登録を行うと、<Tooltip data-tooltip-id="react-containers-DefinitionTooltip-0" href="/docs/ja-JP/ja-jp/glossary?term=multifactor-authentication" tip="多要素認証（MFA）: ユーザー名とパスワードに加えて、SMS経由のコードなどの要素を使用するユーザー認証プロセス。" cta="用語集の表示">MFA</Tooltip>で本人確認が必要になるたびにプッシュ通知が届きます。Guardianは、APNから受信したデータを解析し、使用可能な`Notification`インスタンスを返すメソッドを提供します。

```swift lines theme={null}
if let notification = Guardian.notification(from: notificationPayload) {
    // we have received a Guardian push notification
}
```

通知インスタンスを取得すると、`allow`メソッドを使用して簡単に認証要求を許可できます。以前に取得した登録済みデバイスからの情報も必要です。複数の登録がある場合、必ず通知と同じ`id`（`enrollmentId`プロパティ）のものを見つける必要があります。

情報があれば、`device`パラメーターはプロトコル`AuthenticatedDevice`を実装しているものとなります。

```swift lines theme={null}
struct Authenticator: Guardian.AuthenticationDevice {
    let signingKey: SigningKey
    let localIdentifier: String
}
```

ローカル識別子はデバイスのローカルIDであり、デフォルトでは登録`UIDevice.current.identifierForVendor`にあります。次に、以下を呼び出します。

```swift lines theme={null}
Guardian
        .authentication(forDomain: "{yourTenantDomain}", device: device)
        .allow(notification: notification)
        .start { result in
            switch result {
            case .success:
                // the auth request was successfuly allowed
            case .failure(let cause):
                // something failed, check cause to see what went wrong
            }
        }
```

<div id="reject-login-requests">
  ### ログイン要求を拒否する
</div>

認証要求を拒否するには、代わりに`reject`を呼び出します。オプションで拒否の理由を送ることもできます。拒否の理由はGuardianログに表示されます。

```swift lines theme={null}
Guardian
        .authentication(forDomain: "{yourTenantDomain}", device: device)
        .reject(notification: notification)
        // or reject(notification: notification, withReason: "hacked")
        .start { result in
            switch result {
            case .success:
                // the auth request was successfuly rejected
            case .failure(let cause):
                // something failed, check cause to see what went wrong
            }
        }
```

<div id="unenroll">
  ### 登録解除する
</div>

登録を削除したい場合、たとえばMFAを無効にしたい場合は、以下の要求を行います。

```swift lines theme={null}
Guardian
        .api(forDomain: "{yourTenantDomain}")
        .device(forEnrollmentId: "{userEnrollmentId}", token: "{enrollmentDeviceToken}")
        .delete()
        .start { result in
            switch result {
            case .success:
                // success, the enrollment was deleted
            case .failure(let cause):
                // something failed, check cause to see what went wrong
            }
        }
```

<div id="set-up-mobile-only-otp-enrollment">
  ### モバイル専用OTP登録をセットアップする
</div>

<Tooltip data-tooltip-id="react-containers-DefinitionTooltip-0" href="/docs/ja-JP/ja-jp/glossary?term=auth0-dashboard" tip="Auth0 Dashboard: サービスを構成するためのAuth0の主製品。" cta="用語集の表示">Auth0 Dashboard</Tooltip>または<Tooltip data-tooltip-id="react-containers-DefinitionTooltip-0" href="/docs/ja-JP/ja-jp/glossary?term=management-api" tip="Management API: 顧客が管理タスクを実行できるようにするための製品。" cta="用語集の表示">Management API</Tooltip>を使用して、MFA要素としてワンタイムパスワード（OTP）を有効にすることができます。このオプションにはQRコードは必要なく、ユーザーが手動で登録できます。

ユーザーを登録に招待するには、[Auth0 Dashboard > ［User Management（ユーザー管理）］ > ［Users（ユーザー）］](https://manage.auth0.com/#/users)に進み、ユーザーを選択します。その後、［Details（詳細）］タブにアクセスし、［Multi-Factor Authentication（多要素認証）］セクションを使用して登録招待を送信します。

<div id="connect-a-resource">
  #### リソースを接続する
</div>

リソースは、Auth0 DashboardまたはGuardian SDKを使って接続できます。

<div id="use-auth0-dashboard">
  ##### Auth0 Dashboardの使用
</div>

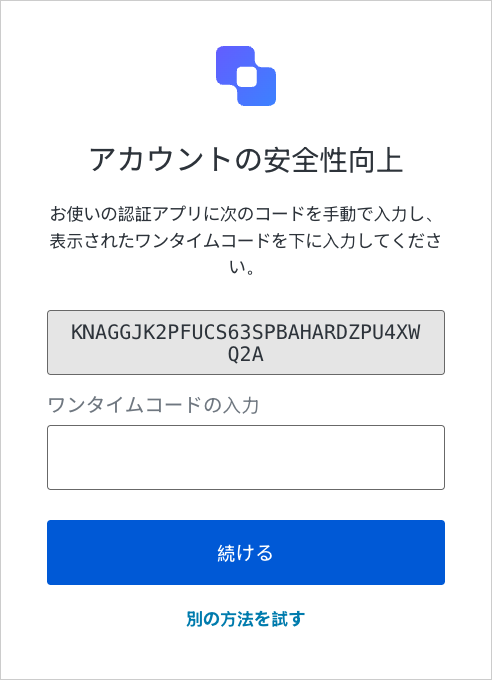
1. Auth0ログインプロンプトにアクセスし、提供されたコード、または別のソースから取得した同様のbase32エンコードキーをコピーします。次のステップでは、このコードを認証アプリケーションに入力します。
   <Frame>
     <img src="https://mintcdn.com/generaltranslationinc/PUgbyUqJRl3iBJzI/docs/images/ja-jp/cdy7uua7fh8z/1yoqiIuERVTwCU8yfx6IM8/24838237a74ae47d42a23a059edad27a/OTP_Challenge_2_-_Japanese.png?fit=max&auto=format&n=PUgbyUqJRl3iBJzI&q=85&s=f3b5844e4d73a5226d19cb2078202186" alt="An example login prompt displaying a one-time code" width="492" height="680" data-path="docs/images/ja-jp/cdy7uua7fh8z/1yoqiIuERVTwCU8yfx6IM8/24838237a74ae47d42a23a059edad27a/OTP_Challenge_2_-_Japanese.png" />
   </Frame>

2. コピーしたコードをGuardianなどの認証アプリケーションに追加します。

<div id="use-the-sdk">
  ##### SDKを使用する
</div>

1. Guardianライブラリをインポートします。

   ```swift lines theme={null}
   import Guardian
   ```

2. コードジェネレーターを作成します。

   ```lines theme={null}
   let codeGenerator = try Guardian.totp(

      base32Secret: enrollmentCode,  // Enrollment code entered by user

      algorithm: .sha1			// Algorithm used by TOTP

   )
   ```

3. 生成されたコードを取得します。

   ```lines theme={null}
   codeGenerator.code()
   ```

<div id="enter-one-time-code">
  #### ワンタイムコードを入力する
</div>

Auth0ログインプロンプトで、前のステップで生成したコードを入力します。

<Frame>
  <img src="https://mintcdn.com/generaltranslationinc/PUgbyUqJRl3iBJzI/docs/images/ja-jp/cdy7uua7fh8z/1yoqiIuERVTwCU8yfx6IM8/24838237a74ae47d42a23a059edad27a/OTP_Challenge_2_-_Japanese.png?fit=max&auto=format&n=PUgbyUqJRl3iBJzI&q=85&s=f3b5844e4d73a5226d19cb2078202186" alt="An example login prompt displaying a one-time code" width="492" height="680" data-path="docs/images/ja-jp/cdy7uua7fh8z/1yoqiIuERVTwCU8yfx6IM8/24838237a74ae47d42a23a059edad27a/OTP_Challenge_2_-_Japanese.png" />
</Frame>

［Continue（続ける）］を選択すると、アプリケーションがユーザーの認証要素として追加されたことを示すメッセージが表示されます。

<div id="log-in-with-your-app">
  #### アプリでログインする
</div>

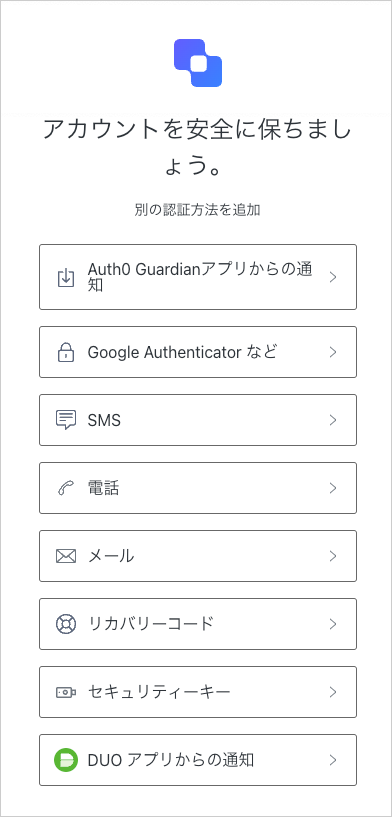
要素が登録されると、ユーザーはアプリを使用してログインできるようになります。まず、認証方法としてGuardianアプリを選択します。
<Frame>
  <img src="https://mintcdn.com/generaltranslationinc/P5C2FvJW5xWCh6NI/docs/images/ja-jp/cdy7uua7fh8z/1k7IsU9kfP5mrXU2jfGHuT/2ab98043294c662bd8b165eb04df9aa1/2025-01-27_14-46-27.png?fit=max&auto=format&n=P5C2FvJW5xWCh6NI&q=85&s=1566780b8927b2e7b0120003836241f9" alt="The authentication method selection screen" width="392" height="817" data-path="docs/images/ja-jp/cdy7uua7fh8z/1k7IsU9kfP5mrXU2jfGHuT/2ab98043294c662bd8b165eb04df9aa1/2025-01-27_14-46-27.png" />
</Frame>

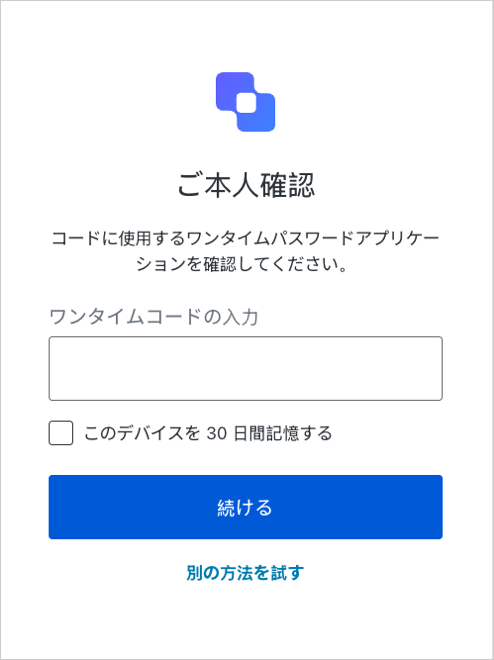
次に、ワンタイムコードをログインプロンプトに入力し、本人確認を行います。

<Frame>
  <img src="https://mintcdn.com/generaltranslationinc/pgNtkB0vi40DIRw0/docs/images/ja-jp/cdy7uua7fh8z/S6uTieLjtuNUrQRMh8uch/21156d1cdf4b839d73ba97b1c149c77b/OTP_Challenge_-_Japanese.png?fit=max&auto=format&n=pgNtkB0vi40DIRw0&q=85&s=fa422544e6ce8fe84f1781521db0f4aa" alt="The Verify Your Identity screen prompting the user for a one-time code" width="494" height="660" data-path="docs/images/ja-jp/cdy7uua7fh8z/S6uTieLjtuNUrQRMh8uch/21156d1cdf4b839d73ba97b1c149c77b/OTP_Challenge_-_Japanese.png" />
</Frame>