> ## Documentation Index
> Fetch the complete documentation index at: https://auth0.generaltranslation.app/llms.txt
> Use this file to discover all available pages before exploring further.
> Auth0 で Demonstrating Proof-of-Possession (DPoP) を使用してトークンを送信者制約する方法を学びます。
# Demonstrating Proof-of-Possession (DPoP)
Demonstrating Proof-of-Possession (DPoP) を使用したトークンの送信者制約は、現在 Early Access の段階です。この機能へのアクセスをリクエストするには、Auth0 の担当者にお問い合わせください。
Demonstrating Proof-of-Possession (DPoP) は、[OAuth 2.0 フレームワーク拡張](https://datatracker.ietf.org/doc/draft-ietf-oauth-dpop/)であり、アプリケーション層で非対称暗号とJSON Web Tokens (JWT) を用いてアクセストークンをバインドまたは[送信者制約](/docs/ja-JP/secure/sender-constraining)するための仕組みです。DPoP によって、アクセストークンをリクエストしたクライアントアプリケーションのうち、秘密鍵を保持しているクライアントアプリケーションだけがそのトークンを使用できるようになります。これにより、盗まれたトークンの不正使用を防止します。
DPoP は公開鍵/秘密鍵を使用して、署名付き JSON Web Token (JWT) である DPoP Proof を作成します。DPoP Proof には次の内容が含まれます。
* クライアントの公開鍵 (`jwk`)。
* メソッド (`htm`) と URI (`htu`) を含む、アクセストークンリクエストを参照するペイロード。
* クライアントの秘密鍵を使用して作成された署名。
* リプレイ防止用の一意の ID (`jti`)。
* 各 API リクエストごとの、アクセストークンの base64url エンコードされた SHA-256 ハッシュ (`ath`)。
* オプション: パブリッククライアントの場合、クライアントアプリケーションが最近 DPoP Proof JWT を生成したことを示すための `nonce` クレーム。
クライアントアプリケーションは、アクセストークンリクエストとして DPoP Proof JWT を Auth0 の認可サーバーに送信します。Auth0 の認可サーバーが DPoP Proof JWT を検証すると、発行するアクセストークンをクライアントの公開鍵にバインドします。
## 一般的なユースケース
一般的な DPoP のユースケースについて説明します。
* **シングルページアプリケーション (SPA) とモバイルアプリケーション:** パブリッククライアントである SPA やモバイルアプリケーションには、バックエンドサーバーのように クライアントシークレット を安全に保存できる、信頼された機密性の高い環境がありません。そのため、トークン窃取のリスクにさらされます。DPoP は、アクセストークンをクライアントアプリケーションの公開鍵にバインドし、DPoP Proof JWT を作成することで、このセキュリティ上の脆弱性に対処します。クライアントアプリケーションは、自身の秘密鍵で DPoP Proof JWT に署名し、それを認可リクエストで送信します。Auth0 認可サーバーは DPoP Proof JWT を検証し、有効であれば、発行するアクセストークンをクライアントの公開鍵にバインドします。
* **サードパーティ API 連携:** クライアントアプリケーションに統合された AI エージェントが、ユーザーに代わって DPoP Proof JWT を使用してサードパーティ API を呼び出す場合、リソースサーバー は、そのリクエストが不正な第三者ではなく AI エージェントから送信されていることを暗号的に検証できます。
## サポートされているアプリケーションのグラントタイプ
Auth0 は、DPoP を使用した sender constraining(送信者制約)に対して、次の[アプリケーションのグラントタイプ](/docs/ja-JP/get-started/applications/application-grant-types)をサポートしています。
| グラントタイプ |
説明 |
authorization\_code |
Authorization Code グラント |
client\_credentials |
Client Credentials グラント |
password |
Resource Owner Password グラント |
refresh\_token |
Refresh Token グラント |
urn:ietf:params:oauth:grant-type:device\_code |
Device Authorization グラント |
[http://auth0.com/oauth/grant-type/password-realm](http://auth0.com/oauth/grant-type/password-realm) |
特定の realm を指定できる Resource Owner Password グラントに類似した拡張グラントを使用します |
[http://auth0.com/oauth/grant-type/passwordless/otp](http://auth0.com/oauth/grant-type/passwordless/otp) |
パスワードレス・グラントリクエスト |
[http://auth0.com/oauth/grant-type/mfa-oob](http://auth0.com/oauth/grant-type/mfa-oob) |
MFA(多要素認証)OOB グラントリクエスト |
[http://auth0.com/oauth/grant-type/mfa-otp](http://auth0.com/oauth/grant-type/mfa-otp) |
MFA(多要素認証)OTP グラントリクエスト |
[http://auth0.com/oauth/grant-type/mfa-recovery-code](http://auth0.com/oauth/grant-type/mfa-recovery-code) |
MFA(多要素認証)リカバリーコード・グラントリクエスト |
urn:ietf:params:oauth:grant-type:token-exchange |
Token Exchange グラントリクエスト |
urn:okta:params:oauth:grant-type:webauthn |
WebAuthn グラントリクエスト |
## 動作の仕組み
次のシーケンス図は、Auth0 における DPoP フローの大まかな手順を示しています。
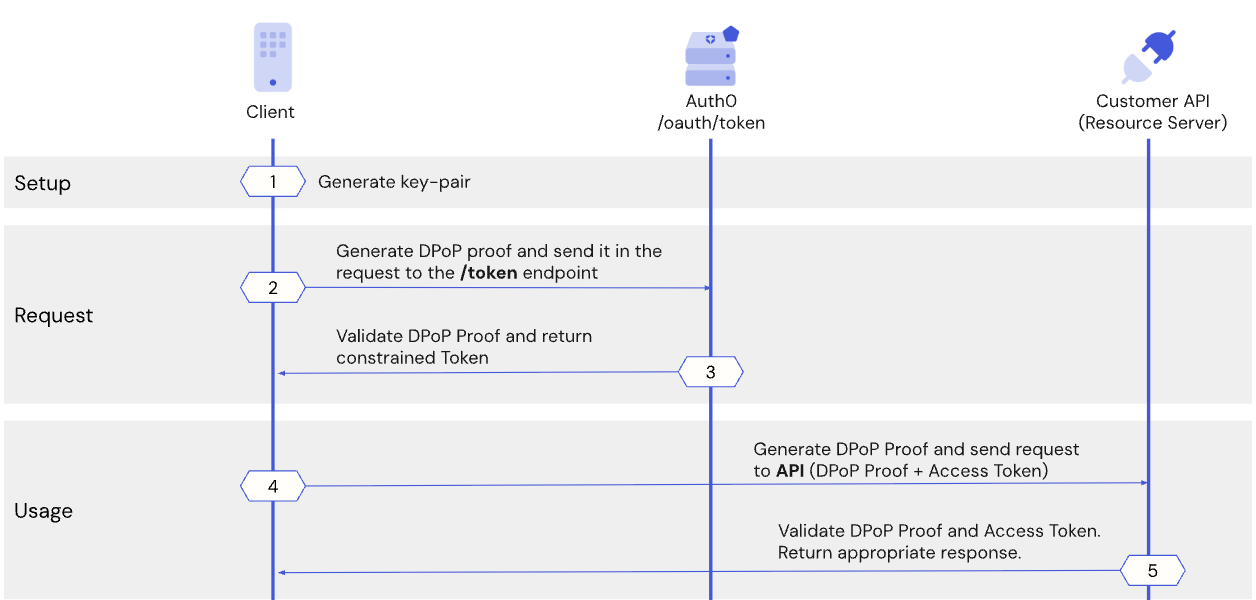 1. Auth0 認可サーバーからアクセストークンを要求するとき、クライアントアプリケーションは一意の暗号鍵ペアを生成し、その公開鍵を用いて、自身が対応する秘密鍵を保持していることを証明します。
2. クライアントアプリケーションは DPoP Proof JWT を生成し、それを Auth0 認可サーバー上の /token エンドポイントに送信します。
3. Auth0 認可サーバーは DPoP Proof JWT を検証し、有効であればアクセストークンを発行し、それをクライアントの公開鍵にバインドします。
4. Customer API を呼び出す前に、クライアントアプリケーションは新しい DPoP Proof JWT を生成し、トークンに関連付けられた秘密鍵を保持していることを証明します。クライアントアプリケーションは、DPoP Proof JWT と送信者制約付きアクセストークンをリソースサーバーに送信します。
5. リソースサーバーは DPoP Proof JWT を検証し、トークンの正当な所有者、すなわち元のクライアントアプリケーションだけが保護されたリソースに正常にアクセスできるようにします。リフレッシュトークンからアクセストークンを要求する場合も、クライアントアプリケーションは新しい DPoP Proof JWT を生成し、リフレッシュトークンがクライアントの公開鍵にバインドされていることを保証します。
1. Auth0 認可サーバーからアクセストークンを要求するとき、クライアントアプリケーションは一意の暗号鍵ペアを生成し、その公開鍵を用いて、自身が対応する秘密鍵を保持していることを証明します。
2. クライアントアプリケーションは DPoP Proof JWT を生成し、それを Auth0 認可サーバー上の /token エンドポイントに送信します。
3. Auth0 認可サーバーは DPoP Proof JWT を検証し、有効であればアクセストークンを発行し、それをクライアントの公開鍵にバインドします。
4. Customer API を呼び出す前に、クライアントアプリケーションは新しい DPoP Proof JWT を生成し、トークンに関連付けられた秘密鍵を保持していることを証明します。クライアントアプリケーションは、DPoP Proof JWT と送信者制約付きアクセストークンをリソースサーバーに送信します。
5. リソースサーバーは DPoP Proof JWT を検証し、トークンの正当な所有者、すなわち元のクライアントアプリケーションだけが保護されたリソースに正常にアクセスできるようにします。リフレッシュトークンからアクセストークンを要求する場合も、クライアントアプリケーションは新しい DPoP Proof JWT を生成し、リフレッシュトークンがクライアントの公開鍵にバインドされていることを保証します。
## Auth0 で DPoP を使用してトークンを送信者制約する
次の図は、Auth0 で DPoP を使用してトークンを送信者制約するエンドツーエンドのフローを示しています。
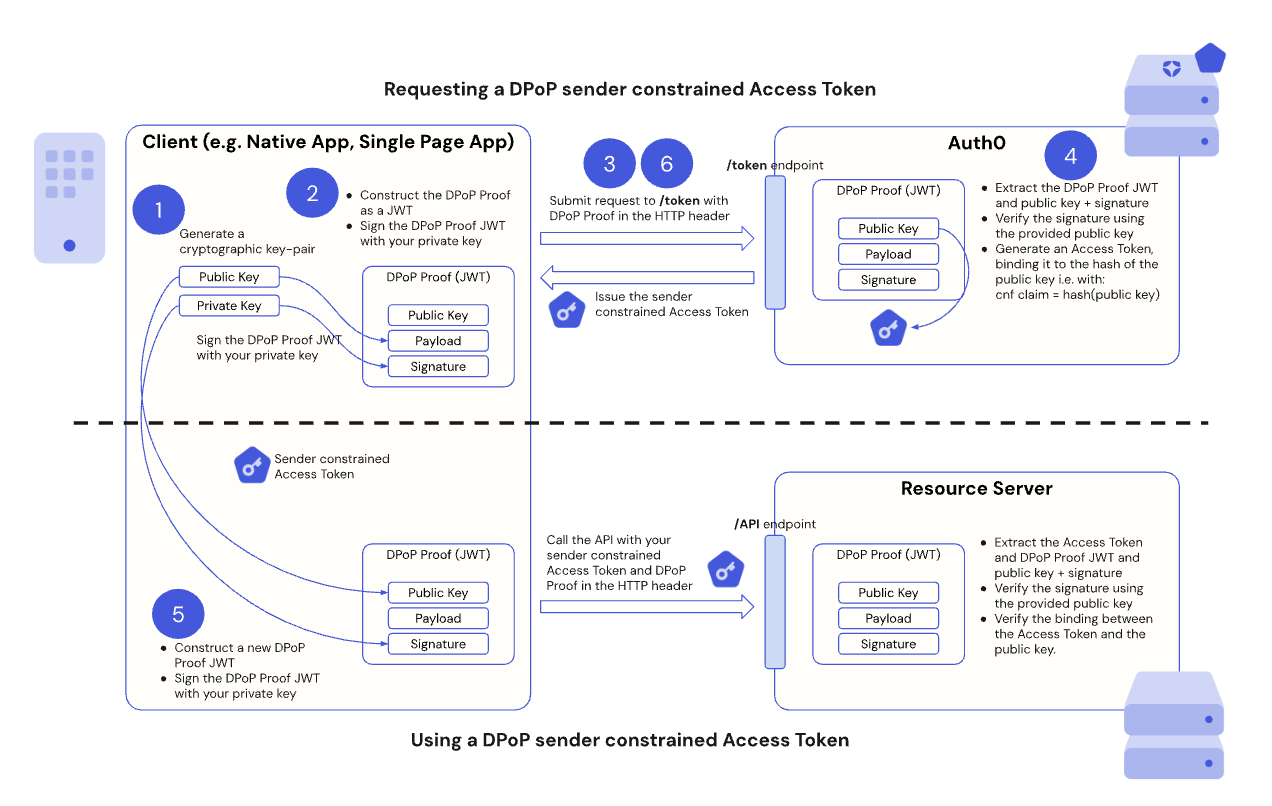 次のセクションでは、Auth0 における DPoP フローについて、実装用のコードサンプルとともにステップごとに説明します。
* [前提条件](#prerequisites)
* [ステップ 1: クライアントアプリケーションが DPoP キーペアを生成する](#step-1-client-application-generates-a-dpop-key-pair)
* [ステップ 2: クライアントアプリケーションが DPoP Proof JWT を作成する](#step-2-client-application-creates-a-dpop-proof-jwt)
* [ステップ 3: クライアントアプリケーションが DPoP バインドトークンをリクエストする](#step-3-client-application-requests-a-dpop-bound-token)
* [ステップ 4: Auth0 認可サーバーが DPoP Proof JWT を検証する](#step-4-auth0-authorization-server-validates-the-dpop-proof-jwt)
* [ステップ 5: クライアントアプリケーションが DPoP バインドトークンと DPoP Proof JWT を使用して API を呼び出す](#step-5-client-application-calls-api-with-the-dpop-bound-token-and-dpop-proof-jwt)
* [ステップ 6: DPoP を使用したトークンのリフレッシュを処理する](#step-6-handle-token-refresh-with-dpop)
次のセクションでは、Auth0 における DPoP フローについて、実装用のコードサンプルとともにステップごとに説明します。
* [前提条件](#prerequisites)
* [ステップ 1: クライアントアプリケーションが DPoP キーペアを生成する](#step-1-client-application-generates-a-dpop-key-pair)
* [ステップ 2: クライアントアプリケーションが DPoP Proof JWT を作成する](#step-2-client-application-creates-a-dpop-proof-jwt)
* [ステップ 3: クライアントアプリケーションが DPoP バインドトークンをリクエストする](#step-3-client-application-requests-a-dpop-bound-token)
* [ステップ 4: Auth0 認可サーバーが DPoP Proof JWT を検証する](#step-4-auth0-authorization-server-validates-the-dpop-proof-jwt)
* [ステップ 5: クライアントアプリケーションが DPoP バインドトークンと DPoP Proof JWT を使用して API を呼び出す](#step-5-client-application-calls-api-with-the-dpop-bound-token-and-dpop-proof-jwt)
* [ステップ 6: DPoP を使用したトークンのリフレッシュを処理する](#step-6-handle-token-refresh-with-dpop)
## 前提条件
開始する前に、次の点を確認してください。
* クライアント アプリケーションおよびリソース サーバーに対して [sender constraining を構成](/docs/ja-JP/secure/sender-constraining/configure-sender-constraining) 済みであること。
## Step 1: Client application generates a DPoP key pair
For DPoP, the client application must generate an asymmetric cryptographic key pair. Auth0 supports the use of Elliptic Curve, such as in ES256 keys. This key pair is unique to your client application and should be securely stored, for example, in a hardware-backed keystore.
The client application keeps the private key secret while including the public key in the DPoP Proof JSON Web Token (JWT) that serves as the “proof of possession” in [Step 2](#step-2-client-application-creates-a-dpop-proof-jwt).
## ステップ 2: クライアントアプリケーションが DPoP Proof JWT を作成する
Auth0 認可サーバーの `/token` エンドポイントから DPoP バインドされたアクセストークンをリクエストする前に、クライアントアプリケーションは DPoP Proof JWT を作成する必要があります。DPoP Proof JWT は、クライアントの秘密鍵で署名された JSON Web Token (JWT) であり、「所持の証明 (proof of possession)」として機能します。
DPoP Proof JWT は、トークンリクエストにひも付く[クレーム](/docs/ja-JP/secure/tokens/json-web-tokens/json-web-token-claims)を含む JWT ヘッダーとペイロードで構成されます。
| DPoP Proof JWT クレーム |
説明 |
typ |
dpop+jwt に設定します。 |
alg |
RS256 や ES256 など、使用する非対称署名アルゴリズムです。 |
jwk |
クライアントの公開鍵を JSON Web Key (JWK) 形式で表現したものです。 |
### JWT ペイロードのクレーム
| DPoP Proof JWT クレーム |
説明 |
jti |
リプレイ攻撃を防ぐための JWT の一意の識別子。 |
htm |
DPoP Proof の対象となるリクエストの HTTP メソッド。たとえば、トークンリクエストの場合は POST、API 呼び出しの場合は GET。 |
htu |
DPoP Proof JWT の対象となるリクエストの HTTP URI(フラグメントおよびクエリパラメーターを除く)。例: `https://api.example.com/data?param=1#section1` は `https://api.example.com/data` になる。 |
iat |
JWT の作成時刻(タイムスタンプ)。 |
ath |
アクセストークンを使用する API 呼び出しの場合、そのアクセストークンの SHA-256 ハッシュを base64url エンコードした値。 |
nonce |
nonce が必要なパブリッククライアントの場合、サーバーから提供される nonce 値。 |
クライアントアプリケーションが DPoP Proof JWT を作成したら、[Step 1](#step-1-client-application-generates-a-dpop-key-pair) で生成した秘密鍵を使って DPoP Proof JWT に署名します。
次のコードサンプルは、クライアントアプリケーションで DPoP Proof JWT を作成して署名する方法を示しています。
```jsx lines theme={null}
import { generateKeyPairSync, randomBytes } from 'node:crypto';
import jwt from 'jsonwebtoken';
// DPoP 鍵ペアを生成
const keyPair = generateKeyPairSync('ec', {
namedCurve: 'P-256',
});
// トークンリクエスト用の DPoP Proof JWT を構築
const jti = randomBytes(16).toString('base64url');
const jwk = keyPair.publicKey.export({ format: 'jwk' });
const dpopHeader = jwt.sign({
jti,
htm: 'POST',
htu: 'https://[TENANT]/oauth/token',
iat: Date.now() / 1000,
},
keyPair.privateKey,
{
algorithm: 'ES256',
header: {
typ: 'dpop+jwt',
jwk,
},
});
```
## ステップ 3: クライアントアプリケーションが DPoP でバインドされたトークンを要求する
クライアントアプリケーションが Auth0 認可サーバーの `/token` エンドポイントにアクセストークンを要求する際には、リクエストの HTTP ヘッダーに DPoP Proof の JWT を含めます。
```http lines theme={null}
DPoP: {DPoP_proof_JWT_value}
```
以下は、DPoP Proof JWT が設定された DPoP HTTP ヘッダーを含むアクセストークンリクエストの例です。
```http lines theme={null}
POST /oauth/token HTTP/1.1
Host: auth.example.com
Content-Type: application/x-www-form-urlencoded
DPoP: {DPoP Proof JWT}
Authorization: Basic Y2xpZW50MTIzOm15c2VjcmV0
Cache-Control: no-cache
grant_type=client_credentials&client_id=client123
```
クライアントアプリケーションから DPoP にバインドされたアクセストークンをリクエストする処理を実装するには、次のコードサンプルを使用します。このサンプルは、次の処理を行います。
1. 署名済みの DPoP Proof JWT を使用して DPoP HTTP ヘッダーを設定します。
2. 署名済みの DPoP Proof JWT を含む DPoP HTTP ヘッダーを、アクセストークンリクエストで `/token` エンドポイントに送信します。
3. Auth0 認可サーバーからのレスポンスを処理します。
```javascript lines theme={null}
// /oauth/token エンドポイントへリクエストを送信
// [...] を実際の grant_type、client_id、テナント URL に置き換えてください
const response = await fetch('https://[TENANT]/oauth/token', {
method: 'POST',
body: new URLSearchParams({
grant_type: '...',
client_id: '...',
// その他のボディパラメータをここに記述
}),
headers: {
"Content-Type": "application/x-www-form-urlencoded",
// DPoP ヘッダーを追加
dpop: dpopHeader
}
});
// Auth0 認可サーバーからのレスポンスを処理
const result = await response.json();
console.log('Initial token request result:', result);
```
### パブリッククライアント
シングルページアプリケーション (SPA) やモバイルアプリなどのパブリッククライアントが DPoP でバインドされたアクセストークンを要求する場合、クライアントシークレットやその他のクライアント認証パラメータは利用できません。この場合、Auth0 では、クライアントアプリケーションが最近 DPoP Proof JWT を生成したことを保証するために、DPoP HTTP ヘッダーに nonce の値を含める必要があります。
パブリッククライアントが `/token` リクエストを行い、DPoP HTTP ヘッダーに `nonce` の値を含めない場合、Auth0 は `HTTP 400` コードと、次のようなエラーメッセージで応答します。
```js lines theme={null}
{
error: 'use_dpop_nonce',
error_description: '認証サーバーはDPoP証明にnonceが必要です'
}
```
Auth0 はレスポンスヘッダーに `DPoP-Nonce` ヘッダーを含めます。`DPoP-Nonce` ヘッダーの値を使用して DPoP proof を再生成し([Step 2](#step-2-client-application-creates-a-dpop-proof-jwt) と同様)、その値を持つ `nonce` クレームを含めて `/token` エンドポイントへのリクエストを再送信する必要があります。
次のコードサンプルは、パブリッククライアントからの `/token` リクエストに `nonce` クレームを含めて送信し、その後に再試行するまでのエンドツーエンドのフローを示しています。
```jsx lines expandable theme={null}
import { generateKeyPairSync, randomBytes } from 'node:crypto';
import jwt from 'jsonwebtoken';
// DPoP鍵ペアを生成
const keyPair = generateKeyPairSync('ec', {
namedCurve: 'P-256',
});
/**
* DPoP Proof JWTを生成するヘルパー関数。
* @param {string} method - HTTPメソッド(例: 'POST'、'GET')。
* @param {string} url - リクエストの完全なURL。
* @param {string} [nonce] - サーバーからのオプションのDPoP-Nonce値。
* @param {string} [accessToken] - 'ath'クレーム用にハッシュ化するオプションのアクセストークン。
* @returns {string} 署名されたDPoP Proof JWT。
*/
function generateDPoPHeader(method, url, nonce) {
const jti = randomBytes(16).toString('base64url');
const jwk = keyPair.publicKey.export({ format: 'jwk' });
return jwt.sign({
jti,
htm: method,
htu: url,
iat: Date.now() / 1000,
nonce
},
keyPair.privateKey,
{
algorithm: 'ES256',
header: {
typ: 'dpop+jwt',
jwk,
},
});
}
// 初回はnonceなしでアクセストークンをリクエスト
async function getTokens(nonce) {
const response = await fetch('https://[TENANT]/oauth/token', {
method: 'POST',
body: new URLSearchParams({
grant_type: '...',
client_id: '...',
// その他のボディパラメータをここに記述
}),
headers: {
"Content-Type": "application/x-www-form-urlencoded",
dpop: generateDPoPHeader('POST', 'https://[TENANT]/oauth/token', nonce),
}
});
const result = await response.json();
return { response, result };
}
// 初回のトークンリクエスト時にはnonceがない
let { response, result } = await getTokens();
console.log('初回トークンリクエスト結果:', result);
if (response.status === 400 && result.error === 'use_dpop_nonce') {
const nonce = response.headers.get('dpop-nonce');
console.log('受信したnonce:', nonce);
// nonceを使用して再試行
({ response, result } = await getTokens(nonce));
console.log('受信したトークン:', result);
}
```
## Step 4: Auth0 Authorization Server validates the DPoP Proof JWT
When the Auth0 Authorization Server receives the token request, it does the following:
* Extracts the DPoP Proof JWT, its public key, and signature.
* Verifies the signature using the provided public key.
* Validates the `htm`, `htu`, `jti,` and `iat` claims.
* If valid, it issues an access token. The Auth0 Authorization Server includes a confirmation claim, `cnf`, in the access token. The `cnf` claim contains the thumbprint (hash) of the public key taken from the DPoP Proof JWT. By including it in the access token, the Auth0 Authorization Server binds the access token to that specific public key, or “sender-constrains” the access token.
* Sets the `token_type` in the `Authorization` header to `DPoP` instead of `Bearer` in the token response. Traditionally, when the access token is passed in the `Authorization` header, it is set to `Bearer`. However, because we’re passing an access token bound to a public key using DPoP, it is set to `DPoP` instead.
* The Auth0 Authorization Server then issues the DPoP sender-constrained access token to your client application.
## ステップ 5: クライアントアプリケーションが DPoP バインド済みトークンと DPoP Proof JWT を使って API を呼び出す
DPoP を適用しているリソースサーバーへのすべての API 呼び出しに対して、クライアントアプリケーションは DPoP バインド済みアクセストークンと新しい DPoP Proof JWT の両方を提示する必要があります。
すべての API リクエストで DPoP Proof JWT を必須とすることで、DPoP は秘密鍵を保持しているクライアントアプリケーションのみがアクセストークンを使用できることを保証します。
新しい API リクエストを行うとき、クライアントアプリケーションは次を行います。
1. 次のクレームを含む新しい DPoP Proof JWT を生成します。
* `htm` クレームは、`GET` や `POST` などの、API リクエストの `HTTP` メソッドです。
* `htu` クレームは、API リクエストの URI です。
* `ath` クレームは、[ステップ 3](#step-3-client-application-requests-a-dpop-bound-token) で受け取った DPoP バインド済みアクセストークンの base64url エンコードされた SHA-256 ハッシュです。
2. クライアントの秘密鍵を使用して、新しい DPoP Proof JWT に暗号学的に署名します。
3. `DPoP` 認証スキームを使用して、`Authorization` ヘッダーに DPoP バインド済みアクセストークンを含めます。
```javascript lines theme={null}
// DPoP スキームは、認可サーバーから受信した token_type と一致します
Authorization: DPoP {access_token}
```
4. 新しく生成された DPoP Proof JWT を `DPoP` HTTP ヘッダーに含めます。
```http lines theme={null}
DPoP: {new_dpop_proof_jwt}
```
`DPoP` HTTP ヘッダーには、追加の `ath` クレームを含める必要があります。`ath` クレームは、発行されたアクセストークンの SHA256 ハッシュを base64url エンコードした値です。
リソースサーバーは次の処理を行います。
* API リクエストを受信し、アクセストークン、DPoP JWT プルーフ、公開鍵、および署名を抽出します。
* `jwk` ヘッダーに含まれる公開鍵を使用して、DPoP Proof JWT の署名を検証します。
* `htm`、`htu`、`jti`、`iat`、`ath` クレームを検証します。
* DPoP Proof JWT の `jwk` ヘッダーで示されている公開鍵が、アクセストークン内の `cnf.jkt` クレームを介してアクセストークンにバインドされている公開鍵と一致することを確認します。
すべての検証に合格した場合、リソースサーバーはリクエストを許可します。そうでない場合はリクエストを拒否し、アクセスは拒否されます。
次のコードサンプルでは、DPoP を使用して Auth0 からアクセストークンを取得し、その DPoP バインド済みアクセストークンを使用して `/userinfo` エンドポイントを呼び出します。
```jsx lines expandable theme={null}
import { generateKeyPairSync, randomBytes, createHash } from 'node:crypto';
import jwt from 'jsonwebtoken';
const keyPair = generateKeyPairSync('ec', {
namedCurve: 'P-256',
});
function hashToken(token) {
return createHash('sha256').update(token).digest('base64url');
}
function generateDPoPHeader(method, url, nonce, accessToken) {
const jti = randomBytes(16).toString('base64url');
const jwk = keyPair.publicKey.export({ format: 'jwk' });
return jwt.sign({
jti,
htm: method,
htu: url,
iat: Date.now() / 1000,
nonce,
// オプションでアクセストークンハッシュを含む `ath` クレームを含める
...(accessToken ? { ath: hashToken(accessToken) } : {}),
},
keyPair.privateKey,
{
algorithm: 'ES256',
header: {
typ: 'dpop+jwt',
jwk,
},
});
}
async function getTokens(nonce) {
const response = await fetch('https://[TENANT]/oauth/token', {
method: 'POST',
body: new URLSearchParams({
grant_type: '...',
client_id: '...',
// その他のボディパラメータ
}),
headers: {
"Content-Type": "application/x-www-form-urlencoded",
dpop: generateDPoPHeader('POST', 'https://test1.local.dev.auth0.com/oauth/token', nonce),
}
});
const result = await response.json();
return { response, result };
}
// 初回実行時はnonceがない
let { response, result } = await getTokens();
console.log('Initial token request result:', result);
if (response.status === 400 && result.error === 'use_dpop_nonce') {
const nonce = response.headers.get('dpop-nonce');
console.log('Received nonce:', nonce);
({ response, result } = await getTokens(nonce)); // nonceを使って再試行
console.log('Tokens received:', result);
}
// DPoPを使って /userinfo を呼び出す
const userInfoResponse = await fetch('https://[TENANT]/userinfo', {
method: 'GET',
headers: {
// DPoP認可スキームを使ってアクセストークンを渡す
Authorization: `DPoP ${result.access_token}`,
// DPoPヘッダーを含める(今回はアクセストークンハッシュ付き)
dpop: generateDPoPHeader('GET', 'https://[TENANT]/userinfo', nonce, result.access_token),
},
});
console.log('User info response status:', userInfoResponse.status);
console.log('User info result:', await userInfoResponse.json());
```
## ステップ 6: DPoP を使用してトークンを更新する
DPoP によってバインドされたアクセストークンの有効期限が切れた場合、リフレッシュトークンを使用して新しいトークンを取得できます。リフレッシュトークンリクエストには、元のトークンリクエストで使用したものと同じキーペアを使って生成される DPoP Proof JWT が必要です。
以下では、Auth0 における DPoP を用いたリフレッシュトークンフローについて説明します。
クライアントアプリケーションは次の処理を行います。
* Auth0 認可サーバーの `/token` エンドポイントにリフレッシュトークンリクエストを送信します。
* リフレッシュトークンリクエスト用の DPoP Proof JWT を生成します(\[`htm` を `POST`、`htu` を トークンエンドポイントの URI とする点が、[ステップ 2](#step-2-client-application-creates-a-dpop-proof-jwt)と同様です)。
* `DPoP` HTTP ヘッダーに DPoP Proof JWT を含めます。
Auth0 認可サーバーは次の処理を行います。
* DPoP Proof JWT を([ステップ 4](#step-4-auth0-authorization-server-validates-the-dpop-proof-jwt)と同様に)検証し、新しい DPoP によってバインドされたアクセストークンを発行します。
## Important considerations
When implementing DPoP in your client applications, consider the following:
* **Private key security:** The security of your DPoP implementation depends on the security of your client's private key, so you must protect it from unauthorized access. Private keys should be generated and stored in a hardware-backed medium and marked as non-exportable.
* **Replay protection (**`jti`\*\* and **`dpop-nonce`**):\*\* The `jti` claim in the DPoP Proof JWT helps prevent replay attacks for protected resources, such as the [`/userinfo`](https://auth0.com/docs/api/authentication/user-profile/get-user-info) endpoint. The Auth0 Authorization Server currently does not check `jti` reuse on the `/userinfo` endpoint. The Auth0 Authorization Server issues a `DPoP-Nonce` HTTP header in its response, which public clients must include as a `nonce` claim in subsequent DPoP Proof JWTs for enhanced replay protection.
* **Error handling:** You are responsible for implementing logic to handle DPoP-specific errors from the Auth0 Authorization Server or resource server, such as `invalid_dpop_proof` or `use_dpop_nonce`.
* **Client types:** Use DPoP for public clients, such as Single Page Applications (SPAs) or mobile apps that cannot securely store a client secret. For confidential clients, such as backend services with client secrets, DPoP adds a layer of security, but they already have other sender-constraining mechanisms.
* **Performance:** Because generating and signing DPoP Proof JWTs for every API call adds a small overhead, ensure your client application’s cryptographic operations are efficient.
* **Key rotation:** Implement a strategy for rotating your DPoP key pairs for enhanced security. Make sure you use the same key pair for the same session.
* **Persistence:** For client applications that need to maintain a session and reuse DPoP-bound access tokens, such as long-lived SPAs, securely persist and retrieve the original generated key pair across application reloads. If a new key pair is generated or a different key pair is used, the DPoP-bound access token becomes invalid, as it is cryptographically tied to the public key of the original pair. You can persist the key pair, for example, in a browser's `IndexedDB` or a mobile app's secure storage.
## 詳細情報
* [Sender Constraining の構成](/docs/ja-JP/secure/sender-constraining/configure-sender-constraining)